Unix

SSH Gate

Some servers are only accessible inside the university network. JGU provides an SSH jumphost server you can use to connect to these servers.
For authentication, only → public key authentication is allowed.

First you need to create an SSH key. If you already own an SSH key, you can go to the next step.
A guide on how to create an SSH key can be found → here.

You need to link your SSH key to your user account.
To do so, visit https://account.uni-mainz.de/my-account/add-ssh-key
On this site you find an input field named 'SSH-Key hinzufügen'.

Paste your public key into this input field. The comment of this key must contain SSHGATE. You can edit your key inside the field after you pasted it. An SSH key comment is always at the end of the key. If you want to connect to multiple servers using this authentication you need to separate them using ,.
Example: ... SSHGATE,HPCGATE,HPCLOGIN

💡 The server name declares the servers the key is deployed to.
If the same key should be used on multiple servers all servers must be added to the comment. If multiple keys should be used each key comment must contain the corresponding server name.

When you have finished, click on SSH-Key Speichern.

To connect to a server using SSHGATE as a jumphost use the following command.
ssh -J username@sshgate.zdv.uni-mainz.de loginname@Targetserver
The -J option tells ssh to use the first server as a jumphost.

You can add the SSHGATE server to your ssh config file. This way the connection can be called with a shortcut.
To add a shortcut you need to edit the file ~/.ssh/config.
You need to add the following lines.
After the file is edited you can call the shortcut with ssh ShortcutName.

Posted on

Create a Panopto video on linux

The University hosts a Panopto instance to provide online courses. You can find additional information on this service here.
The Panopto app doesn't work on Linux, therefore it can't be used to record videos. It is however possible to upload a video created elsewhere to Panopto.

Create a Video

You can use multiple applications to create a video. An easy solution is the website studio.opencast.org.

Create a video with opencast

To create a video with opencast, visit the website studio.opencast.org. Creating a video suitable for Panopto requires 4 steps.

  1. Select your video source
  2. Select you audio source
  3. Record the video
  4. Download and rename the video

Select your video source

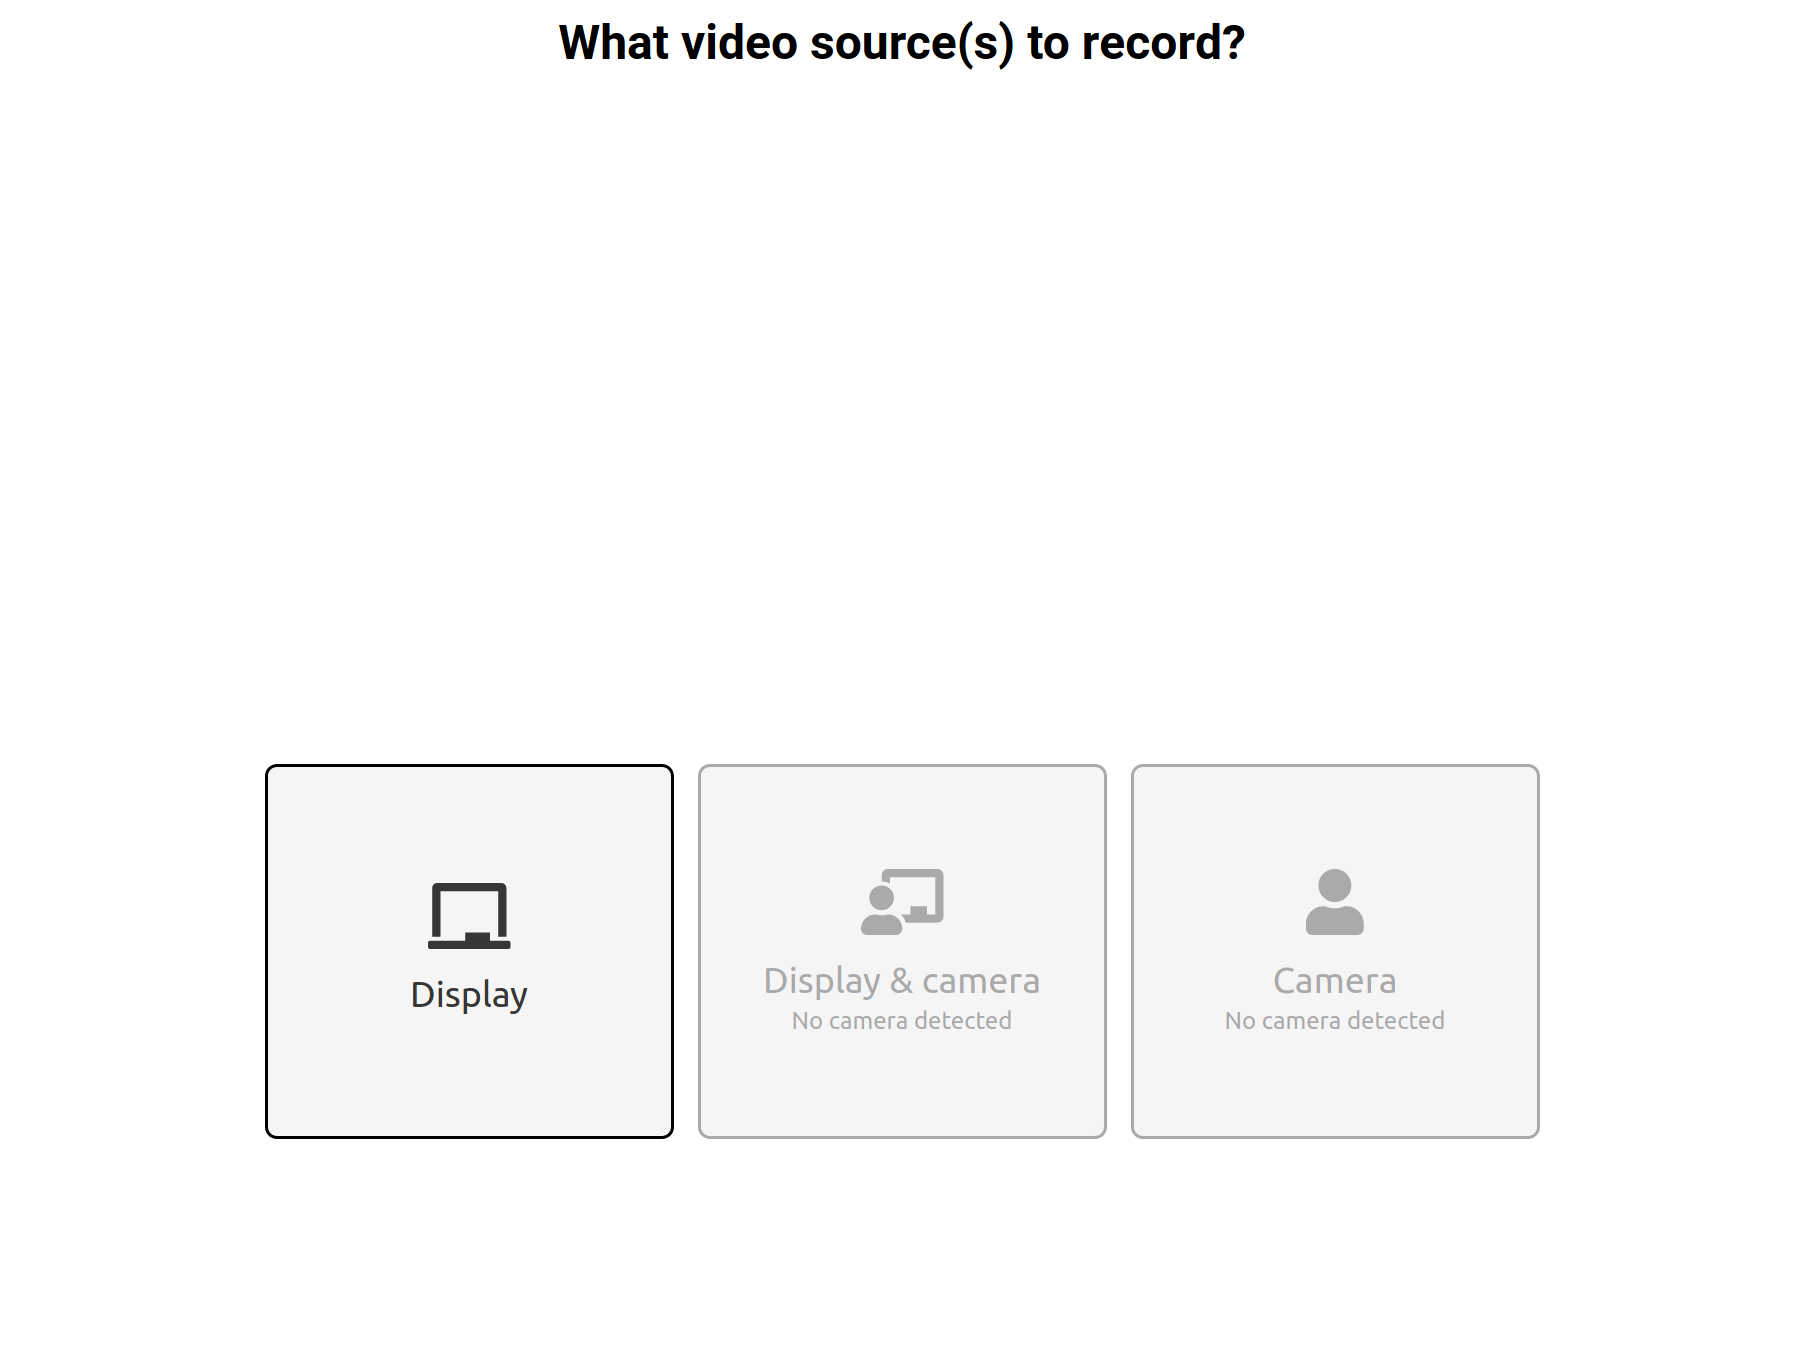
After opening the website you can select your video source. You can choose between display, camera or both.

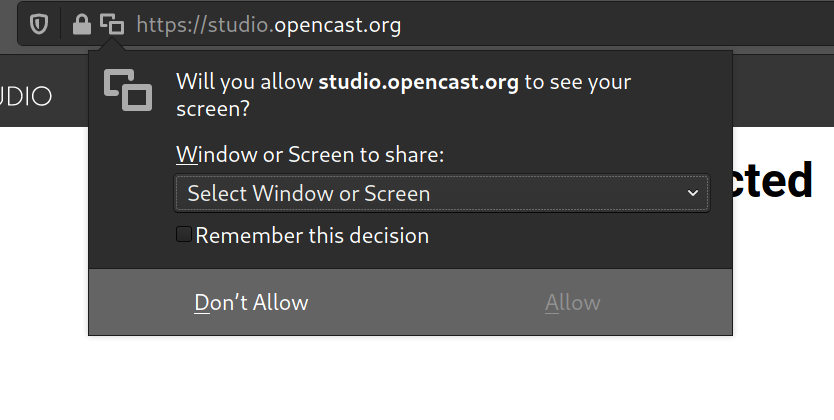
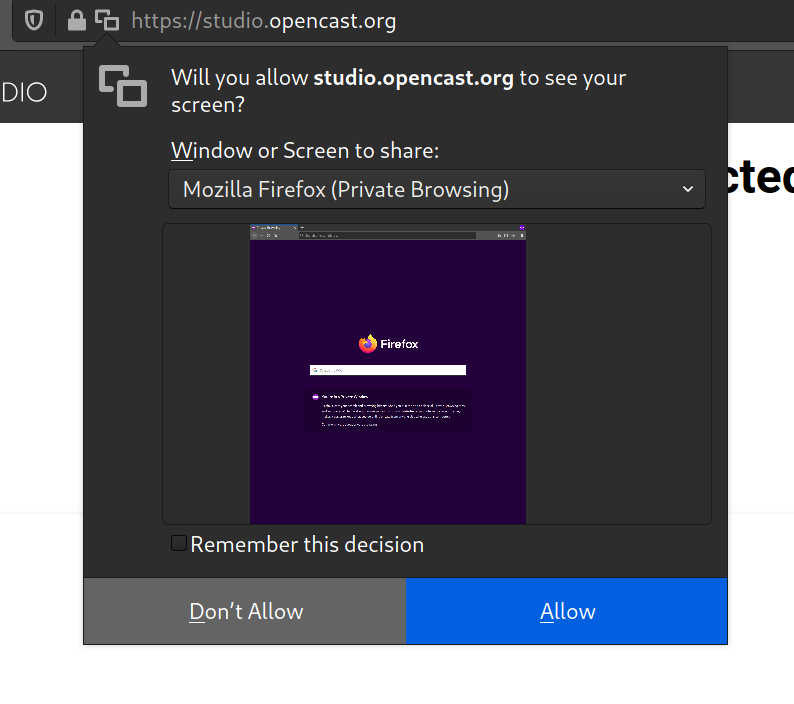
After you selected the video source, your browser will ask for permission for sending data to the website. In this dialogue you can choose what to record. You can choose between windows or the entire screen. This dialogue may be different depending on your browser.

A small preview will show the selected source.

If you are satisfied with your choice, click on Allow.

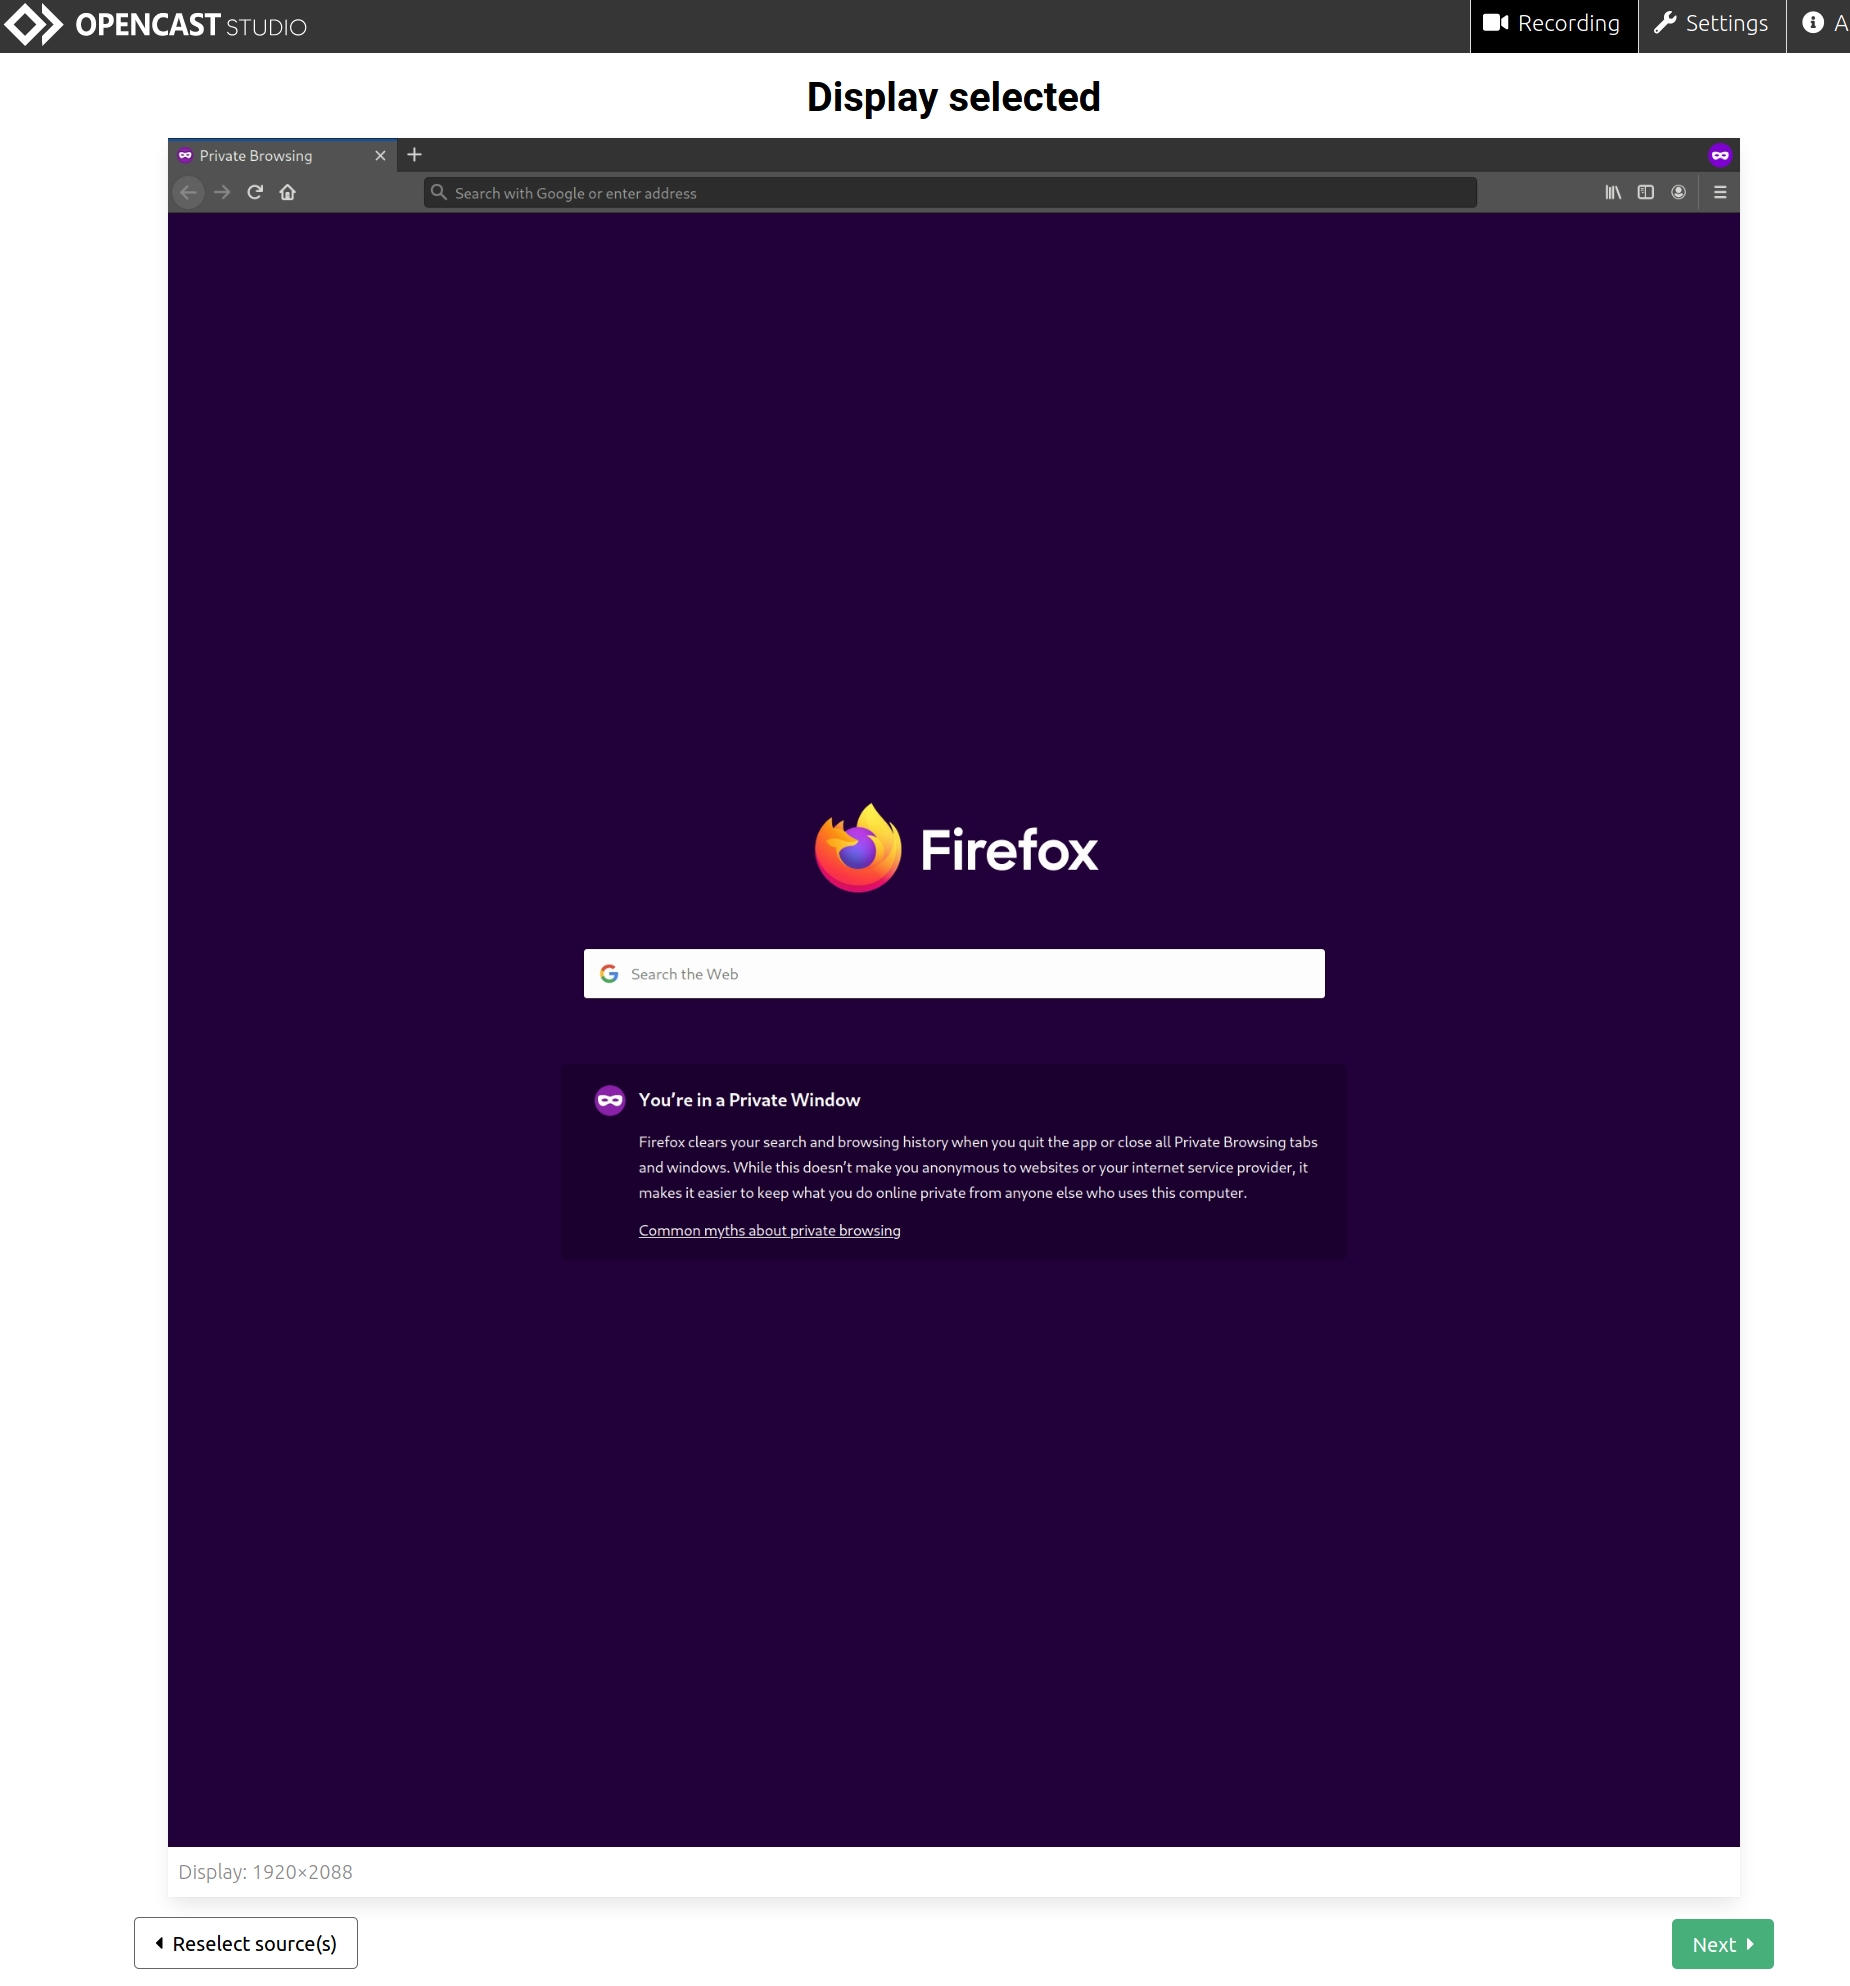
You will see a bigger preview of your video source. If you are happy with your choice, click on Next. To change the video source again, click on Reselect source(s).

Select your audio source

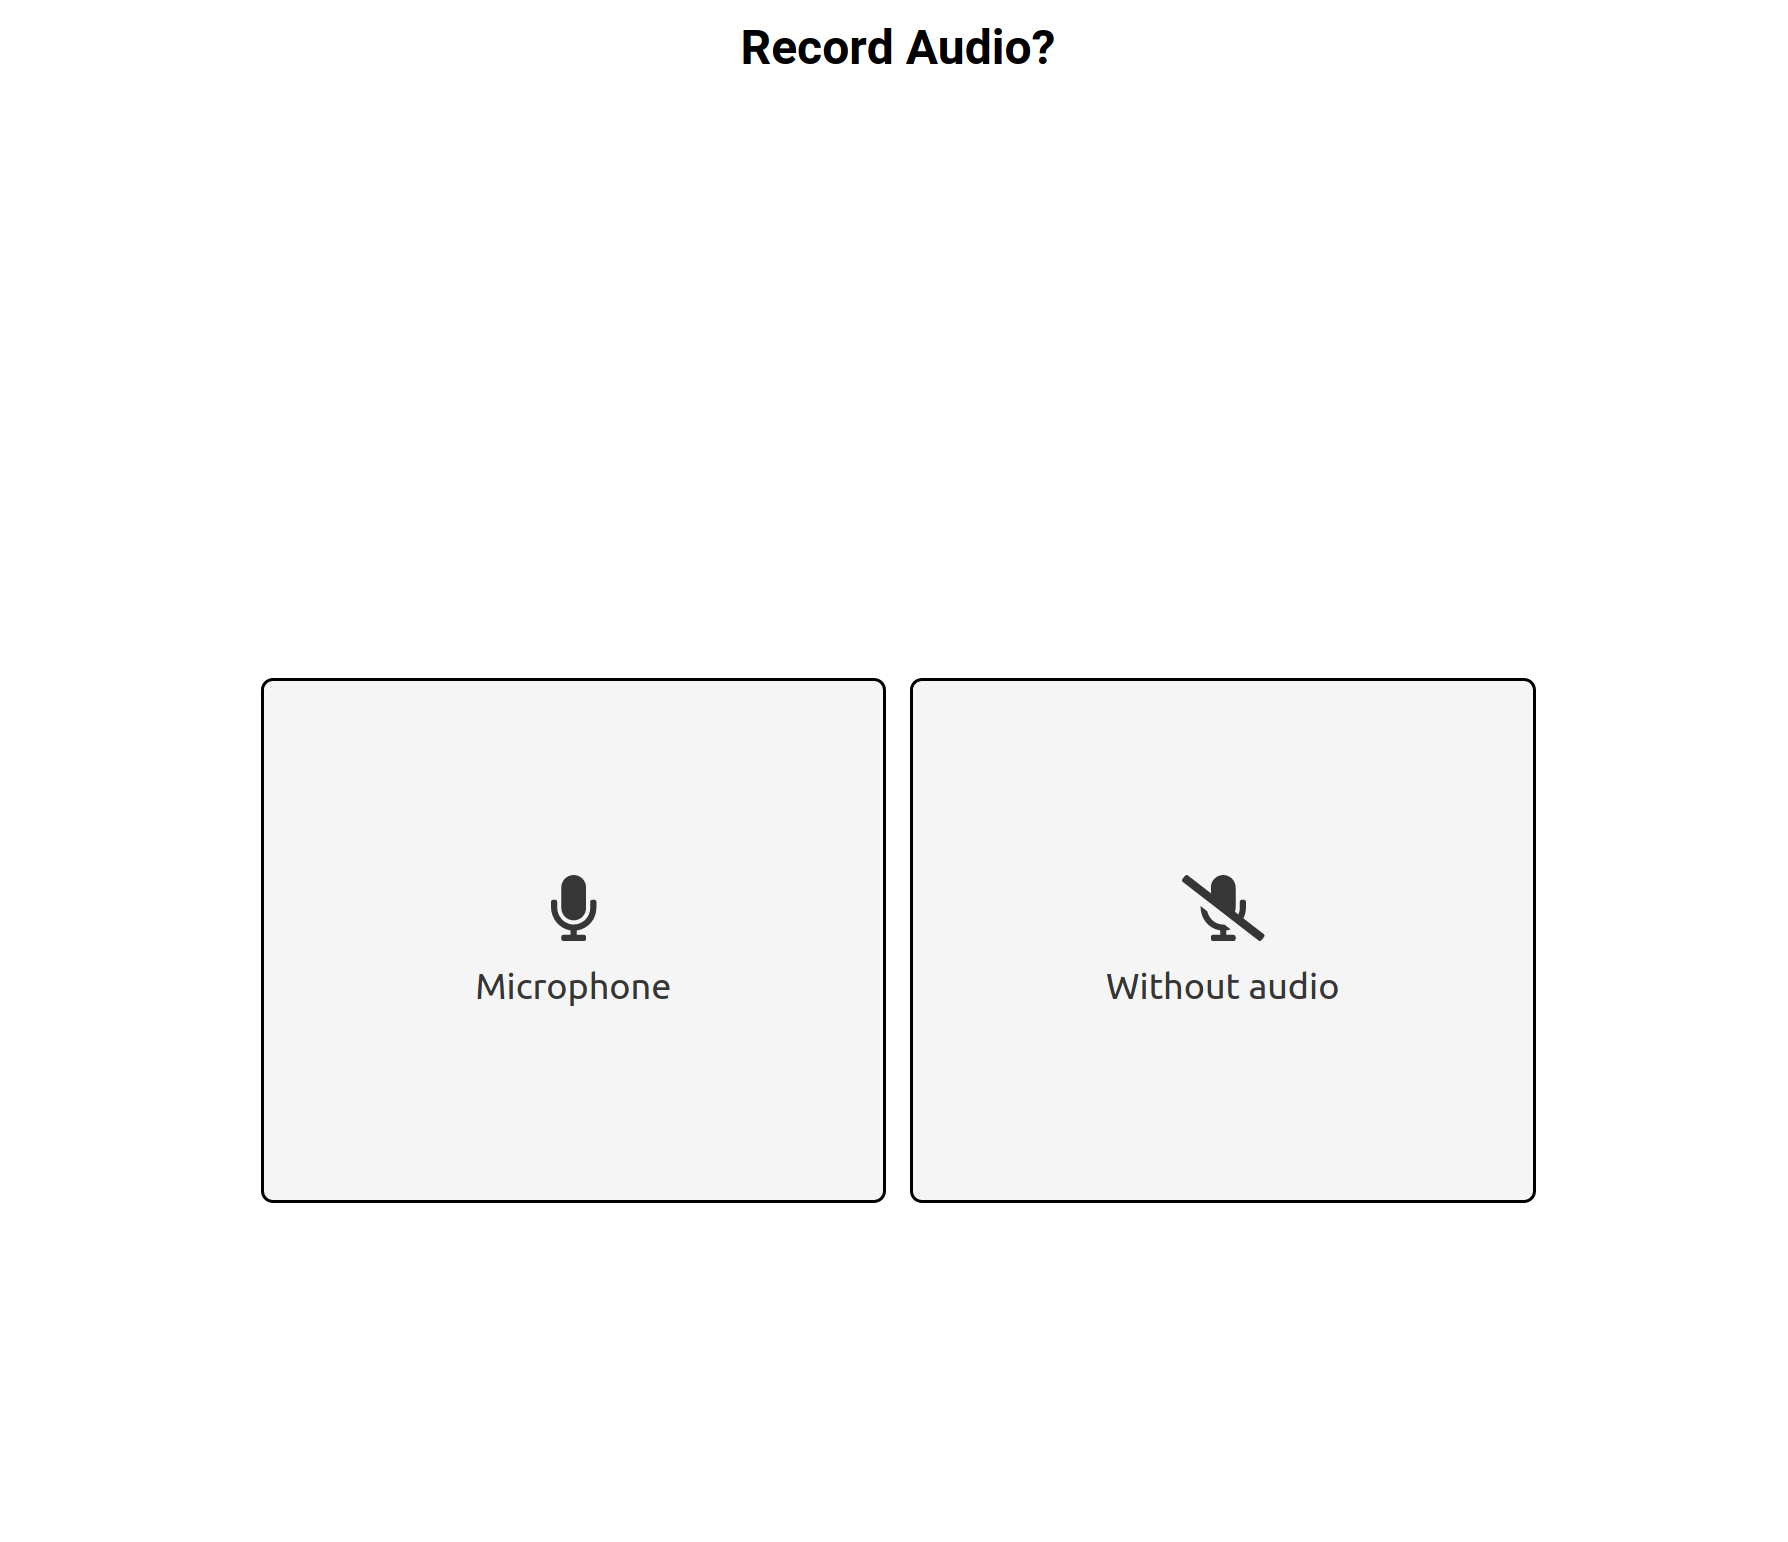
Next, you will be asked to select your audio source. You may also choose to record a video without audio.

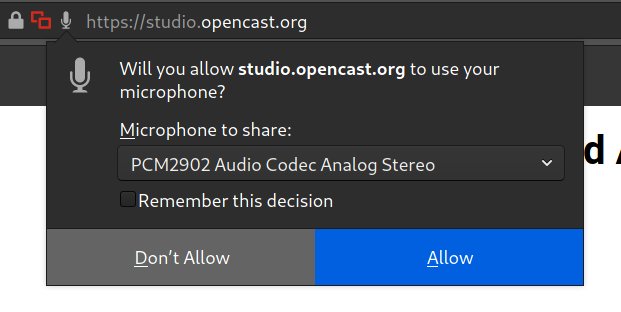
As with the video, you need to grant opencast permission to use your microphone. As before, you can choose your audio source.

You will see a preview of your audio source. If you talk, you should see an amplitude curve on the yellow line, this shows that a singal is picked up.

If your audio source was set up correctly, click on Next. If you want to choose a different audio source, click on Back and repeat the audio setup.

Record the video

After choosing video and audio source you will be shown a preview. If you are ready to record the video, click on the red button below the preview.

If you have finished recording, click the same red button.

After you have finished your recording, a preview of the video will be shown. You can hit play and check your work. If you are satisfied with your work, click on Next, else click on Discard and record again to record again.

Download and rename

When you have finished your work, you can download the video.

The file ending will be .webm . This filetype is not recognized by Panopto. Therefore you need to change the file ending to .m4v.

This file can then be uploaded to Panopto.

Posted on

Linux available in course rooms 3 and 4

Due to an increased demand regarding the availability of Linux computers usable for courses, a Linux operating system (ZDV Linux Desktop), which may be started as an alternative operating system on our course room computers, has now been made available in course rooms 3 and 4.

This has been signposted on the doors of course rooms 3 and 4. Documentations about starting the course room computers using Linux, as well as about shutting down Linux and restarting the computers using Windows, are to be found on the walls of these rooms (in German and English), as well as on the following web site:

https://www.en-zdv.uni-mainz.de/linux-within-the-course-rooms/

In case you are interested in using Linux as an alternative operating system in other course or pool rooms,  please, contact our helpdesk:

Contact

Hotline/Helpdesk of the Data Center
Johann-Joachim-Becher-Weg 21
Tel.: 06131 39-2 63 16
E-Mail | Homepage
Monday until Friday from 9.00 until 18.00
Floor plan


More news from the Data Center → may be found here.

Linux Server Hosting

The ZDV offers hosting of self administrated servers as virtual servers. We provide help in choosing the right server, depending on your workload and required resources.
This service is offered to faculties, institutes, teams and other bodies of the university.

Requirements

You must name a responsible administrator with sufficient knowledge to administrate a Linux server.

Services provided by the ZDV

  • Creation of the virtual server with required resources.
  • Installation of operating system (Debian).
  • Creation of a DNS entry.
  • Deployment of ssh keys for administrative access.
  • Integration of your server into the ZDV infrastructure (backups, system monitoring, mail).
  • Automatic installation of security updates for the base operating system.
    (❗❗This does not include updates for programs installed by an administrator.❗❗)
  • Support

Responsibilities of a server administrator

Server administrators are responsible for securing their server. This includes staying up-to-date about security vulnerabilities, and fixing them.

⚠️The ZDV reserves the right to block or shut down a server if unpatched critical security vulnerabilities, compromised machines or risks for other systems are detected.

Restrictions

The virtual servers are not designed for constantly highly demanding tasks, e.g. simulations or analysis.

Request a virtual server

Additional information

To prevent abuse of our mail system, you need to sign in before you are allowed to send any mail, like you do with Outlook and Thunderbird. By doing so, the ZDV can differentiate between authorized and abusive use, e.g. making sure no one can send messages in someone else's name.

If the mail is sent by a specific program (and not a person,) this may not be possible. For this use case the ZDV provides a mailproxy.

To use the mailproxy, enter the following details into your specific program:
Mail- or SMTP-Server: mailproxy.zdv.uni-mainz.de
Port: 25
Connection security: Optional
Authentication (name and password): not necessary

This way, the mail is send to the mailproxy, the proxy checks if your server is allowed to send such a mail. To allow sending of mails, rules need to be created.

Rules are based on the receiver of the mail.
For sending mails via the mailproxy, the following restrictions apply:

  • Sending mails with a personal address is not possible.
  • If a reply is expected, the from address must be a working address, e.g. info@uni-mainz.de.
  • If no reply is expected, the from address can be noreply@uni-mainz.de.
  • If the mail is sent to an address outside of the university, the server part of the from address (e.g. "uni-mainz.de" for most university addresses) needs to be known outside of the university network. Otherwise the mail won't be accepted by the receiving server. This is the reason, why internal addresses like info@server.faculty.uni-maint.de are not usable.

It is possible to create any number of rules.
To create a rule, we need the following information:

  • Name of your server
  • Sending address
  • Recipient address

Here are some examples:

System: internal-server.zdv.uni-mainz.de

Sending address: info@uni-mainz.de
Recipient: any, worldwide

Sending address: news@zdv.uni-mainz.de
Recipient: only Uni Mainz

Sending address: status@zdv.uni-mainz.de
Recipient: postmaster@uni-mainz.de

To create a rule, send an e-mail with the subject Mailproxy to: linux@uni-mainz.de.

To ensure safety of our university network, servers are, by default, not allowed to connect to the internet.

If you need to establish a connection from your your server to the internet, a rule needs to be created. These rules are created on the ZDV webproxy.
Your server sends a request to the webproxy. The webproxy then decides, if the connection is allowed or not.

Set up the proxy on your server

To add the proxy to your system, you need to add the following lines to /etc/enviroments.

http_proxy=http://webproxy.zdv.uni-mainz.de:3128
https_proxy=http://webproxy.zdv.uni-mainz.de:3128
no_proxy=localhost,0.0.0.0,127.0.0.1,127.0.0.0/12,.zdv.uni-mainz.de,.uni-mainz.de,zdv.net,rlp.net,*.zdv.uni-mainz.de,*.uni-mainz.de,*.zdv.net,*.rlp.net,10.94.0.0/12,10.96.0.0/12
HTTP_PROXY=http://webproxy.zdv.uni-mainz.de:3128
HTTPS_PROXY=http://webproxy.zdv.uni-mainz.de:3128
NO_PROXY=localhost,0.0.0.0,127.0.0.1,127.0.0.0/12,.zdv.uni-mainz.de,.uni-mainz.de,zdv.net,rlp.net,*.zdv.uni-mainz.de,*.uni-mainz.de,*.zdv.net,*.rlp.net,10.94.0.0/12,10.96.0.0/12

Add rules for your server

To add a rule, send an e-mail with the subject Webproxy to: linux@uni-mainz.de.

CFEngine is a program to administrate a number of computers via a central server. This way, there is no need to set up every computer manually.
On ZDV Linux and virtual servers CFEngine comes preinstalled and configured.

CFEngine consists of 2 components.

  1. A local client, which makes changes to the system.
  2. A server, which provides information to the client on what to change.

Changes could be creation, deletion or changing of files.
Different changes are made based on the computer. For example, a desktop needs other changes than a server.
To differentiate between the different computers, CFEngine assigns different classes to each computer.
The server instructs the client to make a changes to a specific group. The client checks, if the computer is a member of this group and applies the change accordingly.
During this process, local changes can be overridden.


Local changes are overridden by CFEngine

If local changes are overridden by CFEngine, exceptions can be made to preserve local changes.
If you need an exception for your computer, please send an e-mail with the subject CFEngine to unix@uni-mainz.de.
We will work with you to add such an exception.

Which files are changed by CFEngine?

The need for different configurations may change over time, based on the type of computer. The instructions for the clients are kept up to date by the ZDV. This means, changes made by CFEngine to a computer can change over time, based on the type of computer.

This documentation explains how to check what changes are made on a computer. To do so, you need to check the classes of the computer and the changes assigned to this class.

What classes are associated with my computer?

To get a list of all classes your computer is associated with, type
cf-promises --show-classes
with roots rights into a terminal.

Where can I find changes made to my computer?

All changes made by CFEngine are stored in .cf files. These files can be found at /var/lib/cfengine3/inputs/local.
The name of the file indicates what it configures.

Reading a .cf file

.cf files are divided into different sections. Everything belonging to a section is indented.
Changes of files are found at the files section.
Here is a snippet of the backup.cf file.

...
	files:

		burpclients.!backup_01::

		    "/etc/cron.d/burp"
                        copy_from	=> secure_cp_b("$(g.dir_masterfiles)/etc/cron.d/burp", $(sys.policy_hub));

		burpclients::

		    "/etc/burp/burp.conf"
                        copy_from	=> secure_cp_b("$(g.dir_masterfiles)/etc/burp/$(sys.host).conf", $(sys.policy_hub));

		    "/etc/burp/clientconfdir/incexc/zdv"
                        copy_from	=> secure_cp_b("$(g.dir_masterfiles)/server/backup-01/etc/burp/clientconfdir/incexc/zdv", $(sys.policy_hub));
...

Line 2: This marks the start of section "files:" everything that is indented belongs to this section.

Line 4: Sets the classes which the changes should apply to. Every indented line will be executed, if the classes are met.
Checking for a class can be done in different ways:

  • class1:: If the computer is in class1.
  • class1.class2:: The dot means the computer needs to be in class1 and in class2.
  • class1|class2:: The | means the computer needs to be in class1 or in class2.
  • class1.!class2:: The ! stand for not. The computer needs to be in class1, but mustn't be in class2.

In this case the computer needs to be in class burbclients and musn't be in in class backup_01.

Line 6: Which file is going to be changed.

Line 7: How the file is changed. In this case a new file is copied from the server and replaces the old one.

Line 9: A new rule is set for all computers in class burbclients.

Line 11, 14: Which files are changed, same as in line 6.

Line 12, 15: How the file is changed, same as in line 7.


Configure your own server

If you use a ZDV Linux version or a virtual server provided by the ZDV, CFEngine is installed and configured by default.
If you installed Linux by yourself, you need to install and configure CFEngine manually.

Keep in mind, that the ZDV doesn't provide configurations for all distributions. If your distribution is not in any class configured by the ZDV, no changes will be made.

Installation
Install the CFEngine package provided by your distribution e.g. cfengine3(Debian, Ubuntu), cfengine(Suse, Fedora).

Bootsrap
After installation, enter cf-agent -B config-01 with root rights into your terminal.

The university provides an OpenID Connect server. With OpenID connect, you can authenticate a user via the ZDV and request data about this user.

A tutorial on how to implement OpenID Connect can be found here.

The current ZDV server configuration is available at openid.uni-mainz.de/.well-known/openid-configuration.

OpenId connect can only be implemented after prior consultation with the ZDV. Please send an e-mail with the subject OpenID Connect to hotline@uni-mainz.de.

To set up OpenID Connect access, the ZDV needs the following information:

  • Which claims are needed
  • A valid redirect_url for your website.
    If you want to develop an own application, this will be coordinated individually.
  • Which flow is being used:
    • Authorization Code Flow (It's recommended to use this flow.)
    • Implicit Flow
    • Hybrid Flow

The ZDV defines the following parameters:

  • client_id
  • client_secret (if necessary)
Posted on

Exchange with Thunderbird

Set up e-Mail

Before you use the Exchange service you need to set up your JGU e-mail in Thunderbird.
Here you find a manual on how to set up your JGU account in Thunderbird.

Set up exchange services

You may use Thunderbird to access your university calendar and address book.
The calendar allows you to access and edit your calendar items.
The address book contains all addresses of students and employees of the JGU.

To use Thunderbird in this way, you need to install two add-ons in Thunderbird:

  • Lightning: This add-on provides calendar functionality for Thunderbird. In some cases, this add-on comes preinstalled.
  • TbSync: This add-on lets you synchronise Thunderbird and Exchange.

To install an add-on, open Thunderbird and click on the the lines at the top right corner. A menu opens. Click on Add-ons:


Next, click on Extensions on the left hand side:


At the top right, a search box will appear. Enter the name of the add-on you want to install into this search box and press Enter.


If you found the right add-on, click on Install.

Add your account

The setup of your account differs depending on whether you have a student account (username@students.uni-mainz.de) or a university account (username@uni-mainz.de).

If the add-on is installed you will see "TBSync: idle" at the bottom right corner of Thunderbird. Click on this text:


A new window opens. Click on Account actionsAdd new accountExchange ActiveSync (EAS).


A window opens. There, enter the following:
Account Name: How you want to name this account.
User name (email address):Your uni-mainz email address.
Password: Your password

Once you have finished this, click on Autodiscover settings and add account:


A popup should appear, telling you that auto discover was successful. Click on OK to close the popup.


You will be forwarded to a new window. The only thing you should change there is the "Sync interval (minutes)" otherwise you have to sync manually.
Once you have finished, click on Enable account & try to connect to server:


You will see a window showing calendars, contacts and tasks with the status OK. You may close this window now.


Even after the status shows OK, it will take a little while until the server provides all information. Just keep Thunderbird running - after a while all data will be synced. After the initial setup the sync won't be delayed.

If the add-ons are installed you will see "TBSync: idle" at the bottom right corner of Thunderbird. Click on this text.


A new window opens. Click on Account actionsAdd new accountExchange ActiveSync (EAS).


Inside the new window, enter:
Account name: How you want to name this account
User name (email address): UNI-MAINZ/username
Password: Your password
Set server configuration to Custom configuration.

Once you have finished, click on Add account.


You will be forwarded to a new window, where you may enter the following:
Server address: mail.uni-mainz.de
Set ActiveSync version to v14.0.
Sync interval (minutes): to set up how often you want to sync the data. If this is set to 0, you need to sync manually.
Once you have finished, click on Enable account & try to connect to server.


You will see a window showing calendars, contacts and tasks with the status OK. You may close this window now.


Even after the status shows OK, it will take a little while until the server provides all information. Just keep Thunderbird running - after a while all data will be synced. After the initial setup the sync won't be delayed.

Posted on

Burp Backup

Burp is a network-based backup solution for your local data.
Burp is aimed at smaller data sets: below 30 GB.
If you need to back up more data, please use Tivoli.
Backups can only be performed inside the university network.

If you want to use Burp, a JGU account for your computer needs to be created in Burp. To do so, we need your computer name. You can find your computer name by typing hostname -f inside a terminal.

Then request a JGU account by sending an e-mail to unix@zdv.uni-mainz.de.
Please provide:

  • your computer name
  • expected size of storage
  • an estimate on how often data will change.

Installation and configuration

ZDV Linux

If you use a ZDV Linux, then installation and configuration will be handled by the ZDV.

Because the config file is deployed by the ZDV, any configuration changes will be overridden. If you need a different configuration, please contact the ZDV Unix department.

Other Linux installations

Installation
Burp packages are available for must Linux Distributions (e.g. Debian, Ubuntu, Open Suse, Fedora ...).

Configuration
The config file of Burp is stored at /etc/burp/burp.conf.

The following lines must be modified:

The following line may need to be added:

cross_filesystem = [path to mount point or unencrypted folder]

The reason: by default, Burp ignores any mounted partitions. One exception are partitions mounted under /home.

Since for encrypted folders (for example Ubuntu's home directory /home, which usually is encrypted) the decrypted files are mounted (just like a hard disk), Burp skips folders with decrypted files.

The option cross_filesystem tells Burp to follow a mounted path.

Include and exclude path are set by the server. The path set by the server will override the local config.

Automatic backups
Enabling automatic backups will be implemented differently on each Linux distribution. Please look at documentation provided by your Linux distribution.
To perform automatic backups, the command burp -a t must be executed at a regular interval.

Working with Burp

Burp is controlled via the terminal. All commands must be run with root privileges.

If you run the command burp, you will see a list with all available backups. To run different actions you need to add options after the Burp command.

Perform a specific action

To tell Burp to perform a specific action, use the option -a (+ what kind of action you want to perform). Only one specific action can be performed at a time.

The following actions are available:

    • Create backup

This command tells Burp to ask the server if it's time for a scheduled backup.
burp -a t
This command starts a manual backup.
burp -a b

    • Show data

burp -a l This is the same action Burp performs if no other action is specified.
To get a more detailed view, use burp -a L.
Without further instructions, this command will show a list with all backups.

    • Restore data

burp -a r
Without further instructions, this command restores all files from the last backup at their original location without overriding any data.

Specific instructions

In addition to performing a specific action, you can further specify instructions. These options may be combined with each other. This allows you to control how burp executes an action.

    • Access specific backup

burp -b [backup number]
Replace [backup number] with the backup number you want to access.

    • Show and restore specific data

burp -r [string]

All files are displayed with their complete path (in which folder they are stored).
Example: A file inside the Download folder will be displayed as /home/user/Download/file.

If you enter a string, Burp checks if this string is included ins the path. If this is the case, the file will be shown or restored.
Example: If you use the string home, all files which include home in their path will be displayed. This is the case for all user files, because they are stored in /home/username/... .
If you want to display the content of a folder, use the folder path as a string. Because all files inside this folder share the same path, they will be displayed.

You can tell Burp to look for this string at the beginning or end of the path.
To look for this string at the end, add a $ at the end of the string burp -r [string]$.
This can be handy, if you are looking for a specific file. The file extension (e.g. .txt) must be included.

To look at this string at the beginning, add a ^ before the string burp -r ^[string].
This can be used to restore top level folders without running the risk to show/restore files in different folders.

If you want to restore specific files, we recommend to list the files first using burb -a l -r [string] and modifying the string until only the specific files are left.
Then use the same string to restore the files using brup -a r -r [string] . This way you can be certain only the specific files are being restored.

    • Restore files at a different location

This is only possible when restoring:
burp -a r -d [path to where to restore]
By default, Burp restores files with their complete path.

    • Strip the beginning of a path when restoring files

This is only possible when restoring:
burp -a r -s [nummber of leading path components]
Burp restores files with their complete path. The beginning of a path can be stripped to only restore a file or a folder starting in the middle of the path.

Example:
The path to the file you want to restore is
/home/user/Documents/Work/file.
If you only want to restore the file, use -s 5 , because the file is at the 5th position.
If you want to restore the Document folder use -s 3 , because this folder is at the 3rd position.

    • Override existing files

This is only possible when restoring:
burp -a r -f

Examples

    • Restore a file from the most recent backup at its original location without overwriting:

burp -a r -r [string]

    • Show folder content from a specific backup:

burp -a l -b [backup number] -r [string]

    • Restore a file from a specific backup at its original location and override any existing file:

burp -a r -b [backup number] -r [string] -f

    • Restore a file from a specific backup at a different location:

burp -a r -b [backup number] -r [string] -d [path to restore location]

    • Restore a file from a specific backup at a different location without restoring the entire path:

burp -a r -b [backup number] -r [string] -d [path to restore location] -s [number of leading path components]

Posted on

ZDV Linux

We provide modified Linux versions. On these versions you may use your JGU account to log in and work directly on your home folder at the Data Center ('ZDV'). This way, all data gets saved on a Data Center server and you can access it from any computer.
The Data Center administrates these installations remotely and supplies them with automatic updates.


Automated Linux Installation

The Data Center provides an automated network Linux installation. With this installation, you may log in with your JGU account and access to your home and group folder will already be set up.
This installation is maintained remotely by the Data Center via cfengine.

The following distributions are available at the moment:

  • Debian 11 Bullseye
  • Debian 12 Bookworm

Requirements

  • To run an automated installation, your computer needs an IP address inside the university network. If your computer doesn't have one, you may request an IP here (German only). Please enter pxelinux at "Anmerkung".
  • If the computer already has an IP address, pxelinux must have a DNS entry. Please ask your network administrator for your workgroup.
    If this option doesn't exist, your network administrator may request an activation of this option from the Data Centers's networkgroup.
  • If Windows was installed before on this host, any existing AD objects need to be deleted beforehand.
    You can request this from your OU-Admin.
  • To boot your computer via network, you need to enable networkboot or PXE boot in your BIOS.

⚠ Attention: It's recommended not to dual boot Windows and Linux. We recommend to install the operating system you use the most, other systems may be installed inside a virtual machine.

Installation:

To boot via network you need to chose network boot as the primary boot option. You may set up this option in your BIOS or press a key during start up. This key varies depending on manufacturer and model. The most common keys are ESC or F12.

After a successful network boot you should see the "PXE Server ZDV" menu.
The installer will guide you through the installation process. Select the option you want and confirm with Enter.

First, you can choose your distribution of choice. We recommend using Debian.

You will be presented with different installation options.

It's recommended to install Debian Bookworm, the latest Debian release.

⚠ Warning: If you choose an installation option without manual partitioning, the entire drive will be used. This will format the drive and delete all locally stored data.
Data stored with your JGU account (data you can access if you log in on a different computer using your JGU account) is not affected.

  • 64 Bit Desktop
    This is the simplest installation. You will be asked for your e-Mail address and to set a local administrator password.
  • 64 Bit Desktop - (de)
    German installation of 64 Bit Desktop.
  • 64 Bit Desktop - (vga=aks)

    ? Hint: If you only see a black screen after you selected an option, you need this install option.

    In some cases, the graphics card doesn't recognize the monitor correctly and the resolution needs to be set manually.
    To do so, press Enter if asked. You will see a list with available resolutions. Enter the three symbols before the resolution you want to choose (e.g. 31B for resolution 1024x768x24) and press Enter.
    The installation is the same as "Desktop 64 Bit".

  • 64 Bit Desktop - Manual Partitioning
    In addition to the other options, you can manually partition the hard drive.
  • 64 Bit Desktop - Expert Install
    You will be asked to set all options manually during install.
  • 32 Bit Desktop
    An automatic installation of Debian 32 Bit version. This version is needed for older hardware.

After you choose the installation option, you will be asked for your e-Mail address. You will receive an e-Mail if something changes on the system, e.g if updates are installed.

Next, you will be asked for a local administrator password. Choose a password on your own. You need this password to perform administrative tasks on your computer (e.g. installing software).

You need to confirm the new disk layout. Navigate with <- and confirm Yes with Enter.

⚠ Warning: Pressing Yes will format the disk and delete all local data.

The installation will take 15-60 minutes depending on your hardware.

After reboot, you can log in with your JGU account. To do so, select not listed on your login screen and enter your university username. You will be asked for your university password.

Posted on

Tivoli Storage Manager: Configuration with Linux

TSM allows you to backup and archive your local data.

Backup

Backup may be used to perform incremental backups of your system. This way you may recover files deleted by accident or a hardware failure.
A backup will only work on your computer.

Archive

Archives let you store files which you don't need at the moment or which only access irregularly. This way you may save local disk space. If you use an archive, you need to enter the password every time you want to access it.
Archives may be accessed by multiple computers and shared by a team.


Configuration

You can use TSM in three different ways. The configuration is different in each case.

  • Use the backup
  • Use the archive
  • Use backup and archive together. You still need to two different nodes a archive and a backup node.
If you use a → ZDV Linux installation you can install TSM by executing this command:
apt install tivsm-ba

If you use a different Linux distribution you can find installable packages → here.

At the moment the Unix backup servers are running version 8. You need to install the same version.

All commands and changes need to be executed with root privileges.

1. Create config files

TSM config files are stored in /opt/tivoli/tsm/client/ba/bin/.

To set up TSM, you need to create dsm.opt, dsm.sys and excludelist configuration files.
Create these files with these commands.
touch /opt/tivoli/tsm/client/ba/bin/dsm.opt

touch /opt/tivoli/tsm/client/ba/bin/dsm.sys

touch /opt/tivoli/tsm/client/ba/bin/excludelist

Now all files are created.

2. Change configuration files

Open /opt/tivoli/tsm/client/ba/bin/dsm.opt and enter:

Open /opt/tivoli/tsm/client/ba/bin/dsm.sys and enter:

You need to make a change in line two starting with NODENAME. Replace your.node.name with the nodename provided to you.

The file /opt/tivoli/tsm/client/ba/bin/excludelist holds information about files and folders excluded from backup.
To exclude a file use EXCLUDE path.to.file.
To exclude a folder and all it's content use EXCLUDE.DIR path.to.folder.
You may use /.../ for multiple paths.

This can be useful to exclude temporary files.
Here is an example to exclude all files named core and folder and sub folder of /tmp, /var/log, /var/run and /var/tmp.

❗ Attention: Encrypted folder
If you use virtual file systems like encfs or ecryptfs (e.g. used by Ubuntu to encrypt your home folder) to encrypt your data, TSM only backs up your encrypted files by default.
If you want to back up plain text files you need to add a virtual mount point, this will tell TSM to back up all data inside a folder, even though they are saved encrypted somewhere else.
To add a virtual mount point you need to add the following line in /opt/tivoli/tsm/client/ba/bin/dsm.sys.

3. Start and log in

To start TSM type dsmc inside your terminal.

You will be asked for your username and password. Your user id is your nodename and it should be seen inside < > brackets. If this is the case you can press Enter without typing it again. Use the password provided to you.

4. Autostart

To autostart TSM and enable automatic backups run update-rc.d dsmcad enable with root rights.
Restart your computer.
Tp make sure everything runs without a problem, type:
cat /var/log/dsmwebcl.log.
You should see time and date for the next backup.

5. configure firewall

To use automatic backups port 1501 needs to be open. On ZDV virtual servers you can open this port by using this command ufw allow TSM.

If you only want to access the archive function you need to create two config files.
Create these files with these commands.
touch /opt/tivoli/tsm/client/ba/bin/dsm.opt

touch /opt/tivoli/tsm/client/ba/bin/dsm.sys

Open /opt/tivoli/tsm/client/ba/bin/dsm.opt with root rights and enter:

Open /opt/tivoli/tsm/client/ba/bin/dsm.sys with root rights and enter:

You need to make a change in line two starting with NODENAME. Replace archive.name with the archive name provided to you.

You may use an archive alongside your backup. To access your archive, you need to log in with a different nodename. It's the same as logging in with a different account.
To access the archive you need to add "-virtualnodename=archive.name" after the dsmc command.
Change archive.name to the name of the archive you want to access.

To open the archives inside command line, type (change archive.name to the archive name you want to access):
dsmc -virtualnodename=archive.name


Usage

TSM can be used inside a terminal or with a graphical user interface (GUI).
The GUI interface is the same on all operating systems. For information about using the GUI, please refer to the Windows documentation → Documentation about backups and restore and documentation about archiving. You can start the GUI interface by typing dsmj inside your terminal.

This documentation explains how to use TSM using a terminal.
TSM can be used in two different ways.

  • Inside an interactive shell, where you can enter all commands.
    To open this shell, type dsmc inside your terminal. You will see a new line starting with tsm>. All commands can be entered there.
  • Directly from a terminal by entering the command when opening TSM.
    To run a command from a terminal, type dsmc "followed by the command".

The next section explains commands used by TSM how you enter them is up to you.

Create initial backup

To create an initial backup of your system use the command backup. Backups will run automatically. There is no need to perform manual backups.

Restore files/folder

To restore a file/folder, use restore "path to file/folder". This will restore the selected file/folder to its original location.
In most cases you need to add additional options to your command if you want to restore files in a specific way. You may combine the different options to restore files/folder the way you want.

Restore files/folder to a different location
restore "path to file/folder" "path where to restore".

Restore deleted or older files
TSM differentiates between active and inactive files. All files of the last backup are treated as active files. Older or deleted files are treated as inactive files. By default, TSM only shows and restores active files.
To restore the latest backed up file no matter if it's active or not, use:
restore "path to file/folder" -inac=yes.

Restore sub folder
By default, TSM only restores the folder or file you have chosen. This means that if you choose a folder, no data in sub folders will be restored. To restore all data (including all data in sub folders), use:
restore "path to folder" -sub=yes.

Select the files/folder to restore
TSM can show you a interactive list of backed up files/folders. You can select which files/folders to restore. This may be helpful if you only want to restore a file from inside a folder and don't know how the file was named or if you want to restore an older backup of the file. To show you the list of files use:
restore "path to file/folder" -pick.
This option is most useful if combined with the -inac=yes and/or -sub=yes option.

Examples

  • Restore a deleted file to a specific location.
    restore "path to file" "path where to restore" -inac=yes
  • Select between all backed up versions of a file inside a folder and restore them at their original location.
    restore "path to folder" -pick -inac=yes
  • Select between all versions of backed up files and folders inside a folder, including files in subfolders and restore them at a specific location.
    restore "path to folder" "path to restore" -pick -sub=yes -inac=yes

Archive files and folders

To make it easier to find and restore archived data, it is best to provide a description when using the archive function. To do so, use -desc='Your Description'. ❗ Attention: Your description must be written between the ' ' symbols.

To archive a file type: archive -desc='description' "path to file".
To archive a folder type: archive -desc='description' "path to folder". ❗ Attention: By default TSM doesn't transfer the content of sub folders.
To archive a folder and sub folder type: archive -desc='description' -sub=yes "path to folder".

Retrieve files from archive

To get a file/folder from an archive, use the retrieve "path to file/folder" command. This will retrieve the file/folder from its original location.
By adding options to this command, you can change how to retrieve the file/folder. You can combine these options to retrieve files/folders, depending on what you need.

Retrieve file/folder to a different location
retrieve "path to file/folder" "path where to restore"

Retrieve sub folders
TSM doesn't retrieve content of sub folders by default. If you want to retrieve content of sub folders use:
retrieve "path to folder" -sub=yes

Retrieve by description
If you only want to retrieve files with a certain description, use
retrieve "path to file" -desc='description you want to retrieve'. ❗ Attention: The description must be inside the ' ' symbols.

Pick files/folders to retrieve
TSM can show you an interactive list of archived files/folders. This way you may select which files/folders to retrieve. This can be helpful if you only want to restore a file from inside a folder and don't know how the file was named. To show you the list of files use:
retrieve "path to file/folder" -pick.

Examples

  • Retrieve a folder including all sub folders to a specific location.
    retrieve "path to folder" "path to restore to" -sub=yes
  • Show a list of files/folder including sub folders with the description 'Very important data' and retrieve them to a specific location.
    retrieve "path to folder" "path to restore to" -sub=yes -pick -desc='Very important data'
To use archives alongside backups, you must enter -virtualnodename=archive.name at the end of the dsmc command, if you want to interact with the archive.
If you want to use an interactive shell, this would look like this:
dsmc -virtualnodename=archive.name.
If you use the terminal directly, this would look like this:
dsmc "your command" -virtualnodename=archive.name.
In both cases replace the archive.name with the archive name you want to access.
Posted on

SSH Keys

SSH keys can be used to authenticate a SSH connection. Using a ssh key is considered more secure than password authentication.

Any ssh key is always a key pair of a private and a public key.

The public key ends with *.pub and may be shared with other computers. If the publick key is added to another computer, you can use your private key to authenticate yourself there.

Do not pass your private key to anyone.


To create a secure key with an encyption depth of 4096 bit (as of 2017), which provides information about the key holder use this command in your terminal:
ssh-keygen -b 4096".
To create a key which includes your name and e-mail address use this command:
ssh-keygen -b 4096 -C "name, first name, e-mail".
This allows an association between the key and you as a person

You will be asked where to save your key. It is recommended to use the default path. You may just press Enter.

Next, you will be asked for a password to encrypt your private key. Enter a password, press Enter and confirm your password. Press Enter again.

Your keys are stored inside your home folder inside a folder called .ssh. The names are id_rsa (private key) and id_rsa.pub (public key).

SSH key authentication will now be used by default, if your public key was deployed at the computer you want to log on to.

You need to install Putty. Putty is also available as a ZDV App. If you install Putty, Puttygen will be installed with it. This program is used to create SSH keys.

Create an SSH key

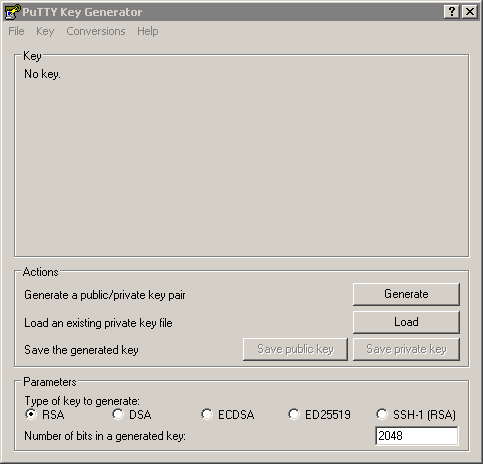
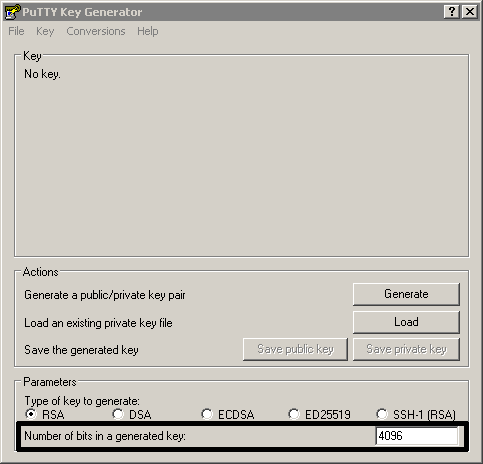
Open Puttygen.

Change the 'numbers of bits generated' to 4096 (written in 2017).

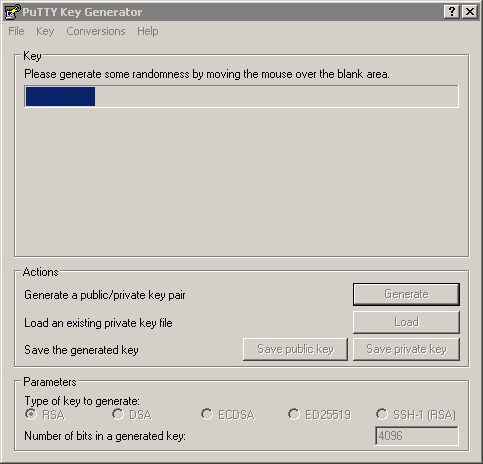
Click on Generate.

Move your mouse over the blank area. If you move your mouse, the progress bar will move forward.

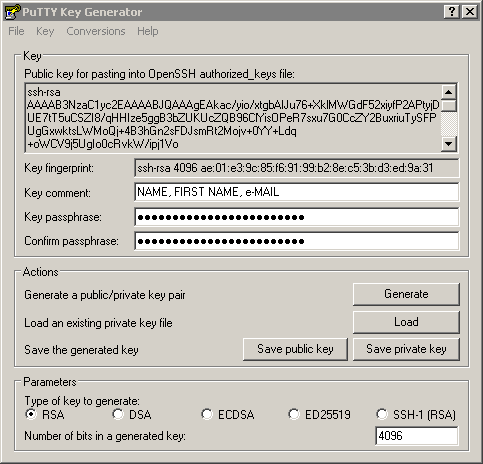
Once the key is generated you can protect it with a password. Enter you password inside the key passphrase field and confirm it.

To create a key which includes your name and e-mail address enter your name, family name, e-mail separated by a , into the Key comment field. This allows an association between the key and you as a person.

Click Save public key to save your public key and Save private key to save your private key.
It's important to remember where you saved your keys.

Authenticate with SSH key

To authenticate with an SSH key, your public key must be added to the remote computer.
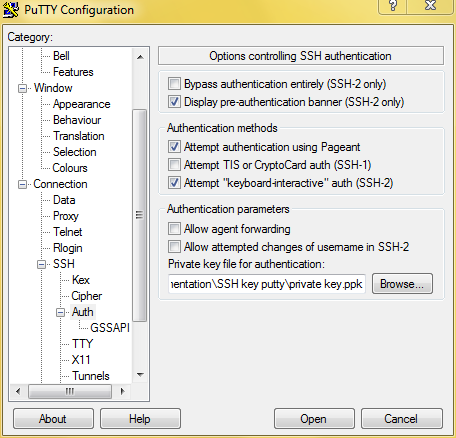
You need to add your SSH key to your connection. Navigate to
Connection/SSH/Auth in the left menu. Click on Browse and select your private key:

If you establish a connection, you will be asked for your private key password.

There is a downside to this method: every time you establish a connection, you will be asked for your private key password. To avoid entering your password each time you make a connection, you may use a software called Pageant. Pageant is part of the Putty installation.

Open Pageant. You will see a tray icon:

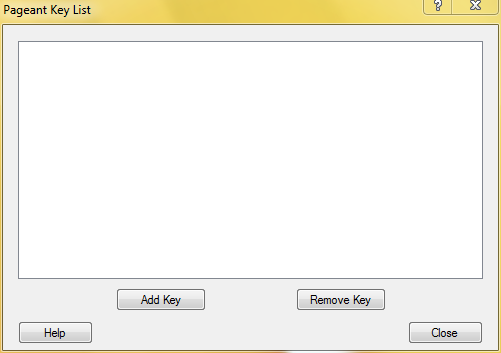
Doubleclick on this icon. A new window will open:

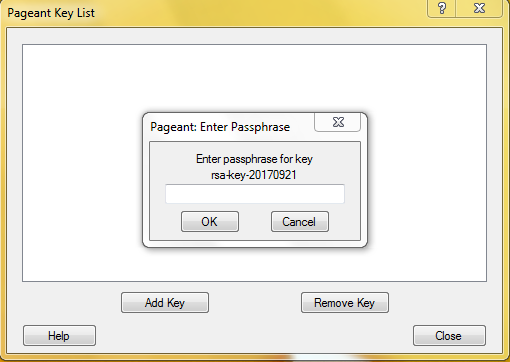
You need to add your private key here. Click on Add Key and choose your private key.
You will be asked for your private key password.

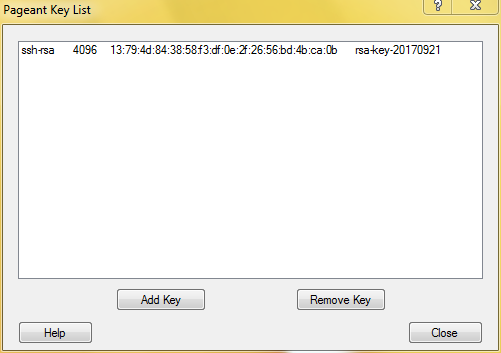
After you entered your password, your key should appear inside the window:

As long as Pageant is running, you do not need to add your private key to Putty. If you establish a connection, your SSH key will be used automatically.

If you close Pageant, all added keys will be deleted and will then need to be added manually each time you open Pageant again. However, there is a way to load your key whenever Pageant is started.
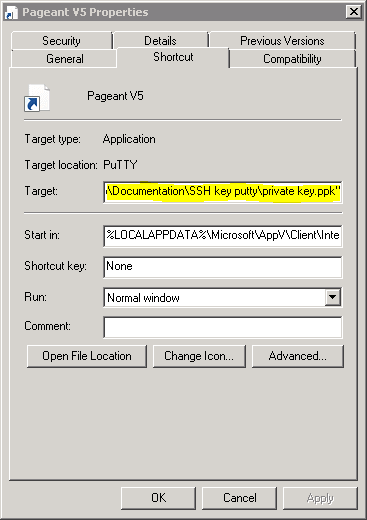
To do so, create a Pageant shortcut. Right click the shortcut and select properties.
You need to change the target line:

Add a space behind the existing line and then add "the path to your private key". It's important that you use the "" symbols.
If you start Pageant using this shortcut, your private key will be loaded automatically and you just have to enter your password once.

Posted on