Unix

Skype for Business with Linux

As a member of the university you may use the chat function of skype for business with your JGU account.
You need to install Piding and the Sipe Plugin.
If you use a ZDV Linux installation the packages are named pidgin and pidgin-sipe.

If you open Pidgin for the first time, the JGU accounts window will open automatically. If a JGU account is already set up, you may navigate to this window by clicking Accounts and then Manage Accounts.

Click on Add.

Fill the following information:
Protocol: change to Office Communicator
User: Your username
Password:Your password
Tick Remember password

If you use a ZDV Linux you can use Kerberos for authentication.. To do so, click Advanced at the top.

Change Authentication scheme to Kerberos.
Tick Use Single Sign-On.

Click on Add.

If you want to add a contact click on Buddies followed by Add Buddy.

A window opens, where you may add new contacts.

Account: may be changed if you use multiple accounts. You add the new contact to the JGU account you select.
Buddy's username: is the e-Mail address of the contact you want to add.
(Optional) Alias: change this option if you want to change the name displayed in your contact list.

Posted on

Printing with Linux

The Data Center provides copiers all over campus, which may also be used for printing and scanning. If you send a print request to a Data Center printer you can print it on all copiers on campus. You can find a tutorial on how to use the printers here.

This tutorial shows how to set up the Data Center printer on Linux.


Install packages

You need the following packages.:

  • cups
  • foomatic-db-engine
  • foomatic-db-compressed-ppds

These packages come pre installed on most distributions. Install them if necessary.

Graphical set up

Step 1: open your printer settings

Open your printer settings by visiting localhost:631/admin in your web browser.

Click on Add Printer.

You will then be asked for your local username and password (you may choose any user on the system as long as they have admin privileges).


Step 2: printer connection

Select Windows Printer via Samba.
Click on Continue


Step 3: define printer connection

As connection enter: smb://uni-mainz/jgu-ps-1.zdv.net/Drucken
Click on Continue.


Step 4: name your printer

Enter a printer name (e.g. ZDV-Printer), give a description (e.g. all public printer) and a location (e.g. Uni Mainz).
Click on Continue.


Step 5: select maker


As make select Generic.
Click on Continue.


Step 6: select model

Select Generic PCL 6/PCL XL Printer Foomatic/pxcolor (recomended) (en).
Click on Add Printer.


Step 7: set printer settings


Select A4 as the default media size.


Terminal setup

To set up the ZDV printer using the terminal, run the following command with admin privileges.
lpadmin -p ZDV -v "smb://uni-mainz/jgu-ps-1.zdv.net/Drucken" -L "ZDV Drucker auf dem Campus" -m foomatic-db-compressed-ppds:0/ppd/foomatic-ppd/Generic-PCL_6_PCL_XL_Printer-pxlcolor.ppd -o printer-is-shared=false && lpadmin -p ZDV -o PageSize=A4 -o MediaSize=A4 -E


Printing

When printing, select the Data Center printer from your printing dialogue. You will be ask for a username and password. Enter your university username and password.

Document is in queue but not printing
Open localhost:631/printers, all printers are listed. If the status shows "Unable to connect to CIFS host" a file needs to be changed.
Open /etc/samba/smb.conf with root rights. Add below [Global] the following line:
client max protocol = SMB3
Inside the file it should look like this:
Posted on

Instant messaging with XMPP

If you own a valid Uni account you are provided with a XMPP account.

What is XMPP?

XMPP is a Internet communication protocol. Like e-Mail, XMPP servers can communicate between each other. This means you can write to and get messages from persons that do not have a JGU account.
Because of server to server communication, a XMPP address looks like an e-Mail address and consists of username@provider.
At JGU XMPP can be reached at jabber.uni-mainz.de xmpp.net score.
Your personal XMPP address is Username@jabber.uni-mainz.de.

Which program do I use?

Because XMPP is a protocol you are not tied to a specific program. Programs are available for all common systems (Windows/Linux/Mac/Android/iOS). A (partial) list with available programs can be found here.

How do contacts work?

XMPP stores your contacts on the server. This means you can access all your contacts, no matter where you log in from. Adding contacts performs two different tasks.

  • 1. Easy chatting

    You can start chatting with every Person you know the XMPP adress of. If you close your XMPP program, you need to enter this address again to start chatting. If you add a person to your contact list, you may start chatting by clicking on the persons name.

  • 2. Grant access to information

    Authorization request in Pidgin.

    In addition to your XMPP address, you may provide additional information like online status, profile picture, e-Mail address, telephone number etc.. For another person to see this information you need to authorize them.
    If someone adds you to their contact list, you get a request to authorize this person to view additional information.

Group chats

XMPP may be used for group chats. Chatrooms may be configured to suit different needs. For this purpose, different options are available. These options can be combined to create e.g. a public room where only specific persons have write access.

  • Persistent or temporary rooms
    A temporary room gets deleted if the last member leaves the room or goes offline. A persistent room is preserved even if all members leave the room or go offline.
  • Public or hidden rooms
    A public room will be announced on the server. Every person can see this room. A hidden room is not announced and you need to know the room name to find it.
  • Members only
    The room is only accessible for members. Other people cannot enter this room.
  • Password protected
    Every person who wants to enter the room needs to enter a password.
  • Moderated room
    Only people with write access can send messages. Other people still have read access.

Setting up an XMPP client

This guide will explain how to set up your XMPP accout using Pidgin. We choose Pidgin for this example because it runs on Windows, Linux and Mac. A list of different programs can be found here.

Log in

If you start Pidgin for the first time, the JGU account window will open.
If you have already configured a JGU account, you can reach this window by clicking Accounts and Manage Accounts.

click on Add... to add a JGU account.

A new window opens.

You need to change the following options.

  • Protocol: select XMPP
  • Username: Is your username
  • Domain: jabber.uni-mainz.de
  • Password: your password

Tick remember password if you don't want to enter your password every time you start Pidgin.

Add a contact

To add a contact click on Buddies and on Add Buddy inside the dropdown menu.

A new window opens.

Change the following entries:

  • Account: If you use multiple accounts you may choose the JGU account you want to add the contact to.
  • Buddy's username: Enter username@server of the contact you want to add. If the person is using a JGU account the server is jabber.uni-mainz.de.
  • (Optional) Alias: You may enter a name which is shown inside the contact list. If you leave this field blank the username is shown.

If someone adds you to their contact list, you will receive a pop up message asking you to authorize this person.

You may allow or deny them to see your online status and additional information.

Posted on

Gitlab

GitLab is a web-based Git repository manager with wiki and issue tracking features.

The Data Center hosts its own GitLab instance for universities of Rhineland-Palatinate at → gitlab.rlp.net.

Documentation on how to use is to be found here: → gitlab.rlp.net/help.

If you have questions or suggestions about this service, you can contact us via email: unix@zdv.uni-mainz.de or via chat: https://mattermost.gitlab.rlp.net/gitlab/channels/town-square.

Courses

The Unix group regularily offers courses on Git and GitLab!

Features

In addition to GitLab default functionality, we have enabled the following:

  • GitLab Mattermost at mattermost.gitlab.rlp.net
  • GitLab Pages below pages.gitlab.rlp.net
  • GitLab Shared Runner (three instances, using Docker executor in privileged mode) for Continuous Integration and Delivery
  • GitLab Container Registry at registry.gitlab.rlp.net
Documentation on how to use is to be found here: → gitlab.rlp.net/help.

Limitations

By default, every user can create 100 projects with a size of 10 GB each. These limits can be increased individually upon request.

Login

If you are a student/employee at a university in Rhineland-Palatinate, you may use your university credentials to log in. To do so, use the button login.rlp.net in the upper right section on the login screen:

However, the use of the Data Center's GitLab is not restricted to students/employees.
If you do not have a student/employee account, you may register a JGU account and log in with a username and password using the form in the bottom right section on the login screen.

Git via SSH

If you want to push and pull to Git repositories in GitLab via SSH, you need to generate a key pair first.
A tutorial is available at www.en-zdv.uni-mainz.de/ssh-key.

Git via HTTPS with Username/Password

If you want to push and pull to Git repositories in GitLab via HTTPS, you need to be aware of the following:

Invitations

You may also invite other people to your project. Inside your project, click on Settings and on Members:

Then click on Select Members to invite:

If the person you are looking for has signed in before, you will be able to search for their name. Otherwise you need to enter an e-Mail address. This doesn't need to be an e-Mail address of a university. If you choose a non-university address, then the invited person will have to register a JGU account, before they can participate in the project.

Login to Mattermost

Mattermost uses your Gitlab credentials to log in. On your first login you need to authorize Mattermost to use your Gitlab account for authentication.
First you need to establish a connection between Mattermost and Gitlab. The dialogue looks different depending if you clicked an invite link or browsed to the side directly.

if following an invite link
browse to site

GitLab Single Sign-On or GitLab depending how you opened the site.
Log in to Gitlab as described above. After logging in you will be asked to authorize Mattermost to your JGU account.

Click on Authorize you will be logged in and forwarded to Mattermost.

Usage

Posted on

Connect to eduroam with Linux

1. Check Certificate

To establish a secure connection with eduroam you need to use a certificate.
This certificate comes preinstalled on most Linux Distros. Please check if it is already installed on your System. You can find it in the folder /etc/ssl/certs/ . The name is USERTrust_RSA_Certification_Authority.pem.
If this certificate is already installed, go to step 2.

https://support.sectigo.com/articles/Knowledge/Sectigo-Intermediate-Certificates
The required certificate is called: Root Certificates: SHA-2 Root : USERTrust RSA Certification Authority

Download the certificate, and remember where you saved it. You need this certificate each time you connect to eduroam, so it's good practice to save it somewhere else than your downloads folder. Otherwise it may get deleted accidentally.


2. Delete existing eduroam profiles

To avoid any issues setting up eduroam, make sure no other eduroam profiles exist and delete them if needed.


3. Create a new connection

Select eduroam inside your network manager.

A window with connection settings will open.

Edit the fallowing entries:

Wi-Fi Security: WPA & WPA2 Enterprise

Authentication: Protected EAP (PEAP)

Anonymous identity: can be blank

CA certificate: Here, you need to select the certificate from step 1.
If the certificate is already installed, select /etc/ssl/certs/USERTrust_RSA_Certification_Authority.pem.
Otherwise select the certificate you downloaded.

PEAP version: Automatic

Inner authentication: MSCHAPv2

Username: Username@uni-mainz.de

Password: Your Password

Click on Connect, you should then get connected to eduroam.

Posted on

Access Linux via SSH

SSH is a network protocol designed to establish secure connections.
In most cases a connection is made to a terminal.
If you want to connect to a server which is only available inside the university network you can use the ssh jump host.


Terminal access

To access your JGU account, enter following command in your terminal:
ssh [username]@linux.zdv.uni-mainz.de

Display application with a GUI

To access programs with a graphical user interface, enter the following command in your terminal.
ssh -Y [username]@linux.zdv.uni-mainz.de
If you run a program with a GUI (e.g. Firefox), the window is displayed on your local computer.
❗Important: This will use a high amount of bandwidth and may not work correctly when using a slow connection.

From Windows

Terminal access

To access Linux via a windows computer, you need to install Putty. Putty is available as a ZDV-App.

Open Putty:

Enter as Host Name (or IP address): linux.zdv.uni-mainz.de. Click on Open.
You will be ask for your university username and password.


Display a GUI Applikation

To display applications with a graphical user interface you need to install the following programs.:
Putty
Xming
Both programs are available as ZDV-Apps.

First, open Xming. An Xming symbol should appear in your taskbar:

Open Putty:

Enter as Host Name (or IP address): linux.zdv.uni-mainz.de.

You need to enable X11 forwarding.


You will find this setting at: Connection/SSH/X11.
Click on Open.
You will be asked for your university username and password.
If you run a program with a GUI (e.g. Firefox), the window is displayed on your local computer.
❗Important: This will use a high amount of bandwidth and may not work correctly when using a slow connection.

Size of home folder

To show the size and available space of your home folder type quota -s into your terminal.
The result is displayed in columns. Look at the column "space" and the first "quota" (second number).
space = Is the used space.
quota = Is the maximum available size of your home folder.

Size of group folder

To show the size and available space of a group folder type this command into your terminal: df -h /uni-mainz.de/groups/"Faculty number"/"Name of group-folder".
Replace "Faculty number" and "Name of group-folder" with your faculty number and the name of the group folder you want to check.
E.g. /uni-mainz.de/groups/10/test, if your want to check the folder test at the biology faculty.

Posted on

Backup copies of server directories – invocation with Linux

Snapshots are backups of files and/or folders at a specific time. Snapshots are read only, you need to restore a file first to edit it again.
Files saved on ZDV fileservers are snapshoted every 4 hours at 0, 4, 8, 12, 16, 20 o'clock.
Snapshots are sorted by:

  • Hourly, snapshot crated every 4 hours.
  • Daily, snapshots created on midnight.
  • Weekly, snapshots created on midnight on Sunday.

The oldest snapshot is at least 3 month old.

Restore a delted or changed file

using your file manager

To open your home folder insider you file manager, press Ctrl+L. You will see an address bar showing the path to your current directory. You can navigate to any folder within your home directory.

Add /.snapshot behind the path.

Press Enter. You will see all available snapshots. To restore a file, copy it to your home folder.

💡 Hint: You can use the same method, if you mounted you home folder using over the Internet using webdav.


using the terminal

Use cd .snapshot to enter your snapshot folder.

Posted on

Instructions for Unix Operating Systems


Internet and Net Access

Establishing a WLAN connection using the wireless network of the university of Mainz (documentation to follow),
Establishing a WLAN connection using eduroam,
Configuring VPN,
Using remote desktop servers
Remote access via SSH
SSH jump host


Printing and Copying

Printing with Linux


Setting up and using operation systems

Live Linux (in the course rooms)
Remote desktop access
Automated Linux installation


E-learning und E-Klausuren

Create a Panopto video using Linux


Posted on

Configuration of VPN with Linux

Using VPN you can connect to the university network over the Internet. If you use VPN your computer behaves the same way as if it is physically connected to the university network. This way you can use the services that are only available from inside the university network.

VPN using IPsec/IKEv2 with Strongswan (recommended)

Installing packages

Install the necessary packages for Strongswan
Debian/Ubuntu:
$ sudo apt install network-manager-strongswan libcharon-extra-plugins
For Ubuntu, the "universe" distribution component must be enabled beforehand:
$ sudo add-apt-repository universe

Fedora:
$ sudo yum install NetworkManager-strongswan-gnome

Afterwards you have to restart at least the NetworkManager service (if in doubt, restarting the whole system will also help):
$ sudo systemctl restart NetworkManager.service

Necessary manual configuration

Now create the configuration file charon-nm.conf with the content charon-nm { plugins { eap-peap { load = no } } } e.g. by
Ubuntu:
$ echo "charon-nm { plugins { eap-peap { load = no } } }" | sudo tee /etc/strongswan.d/charon-nm.conf
Fedora:
$ echo "charon-nm { plugins { eap-peap { load = no } } }" | sudo tee /etc/strongswan/strongswan.d/charon-nm.conf

Create and configure connection

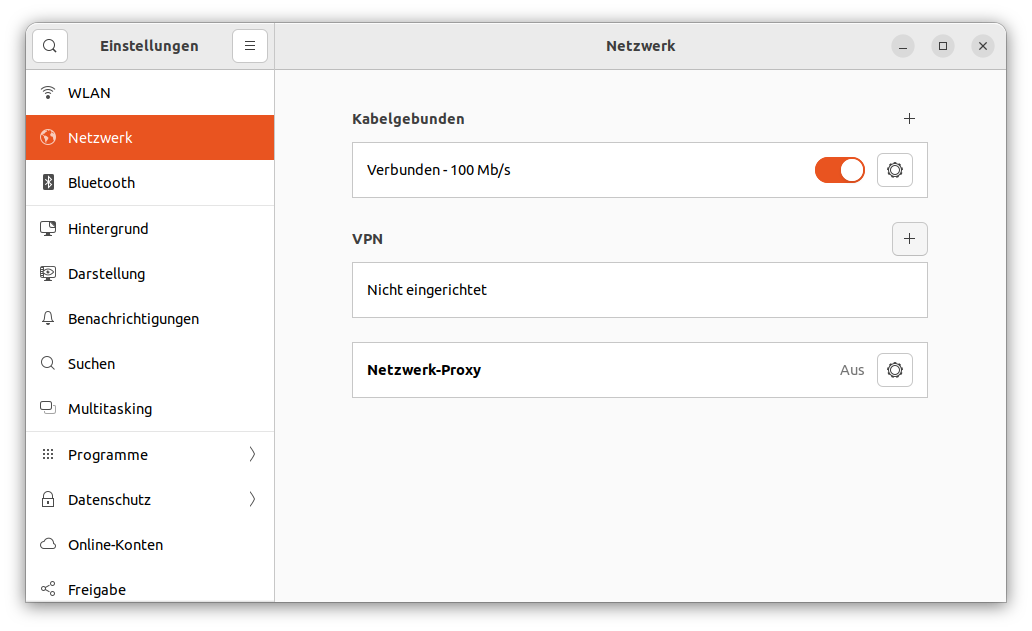
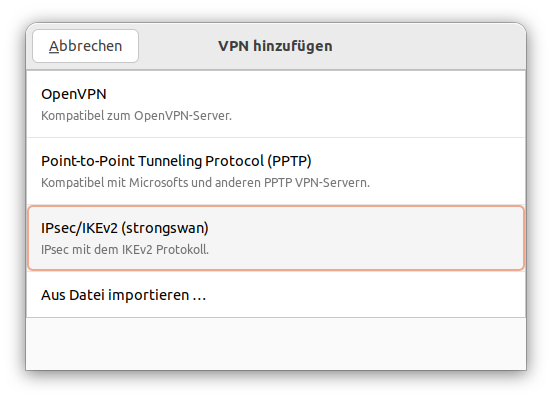
Open the network settings dialog (Settings -> Network -> VPN) and add a new VPN connection by clicking on the plus symbol +:

Select IPsec/IKEv2 (strongswan) as type:

Configure the following parameters:
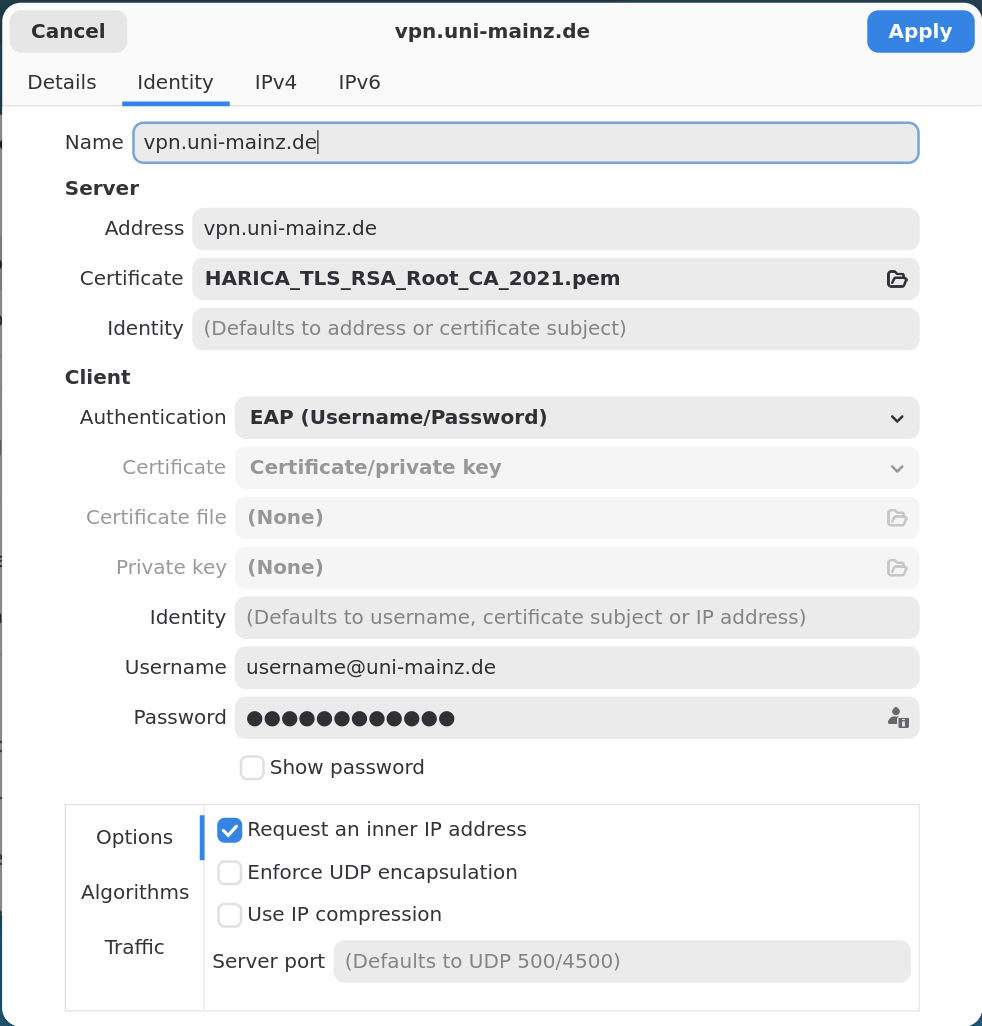
Server -> Address:
vpn.uni-mainz.de
Server -> Certificate:
Comodo_AAA_Services_root.pem (see below)
Client -> Authentication:
EAP (Username/Password)
Client -> Username:
The username of your JGU account followed by @uni-mainz.de
(cf. Username on https://account.uni-mainz.de/)
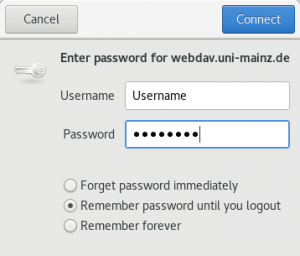
Client -> Password:
The password of your JGU account
Options:
Request an inner IP address
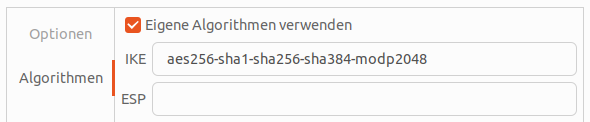
Algorithms:
Enable custom algorith proposals
Algorithms -> IKE:
aes256-sha1-sha256-sha384-modp2048

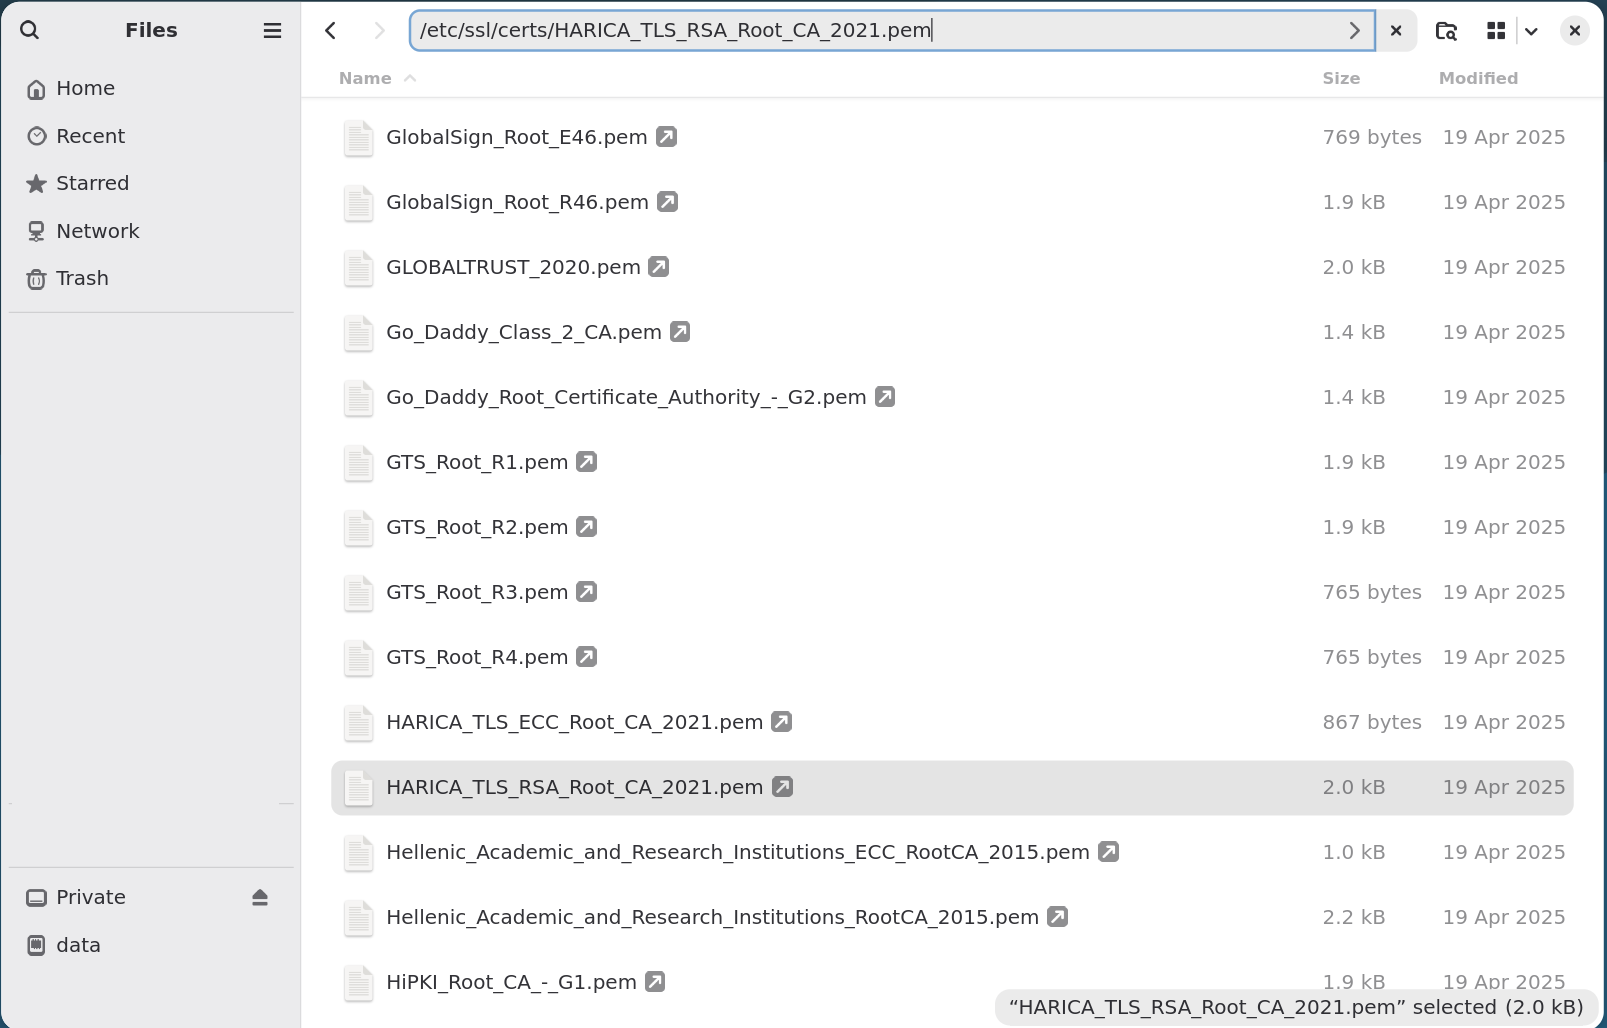
When selecting the server certificate, press STRG+L and enter the following path:
/etc/ssl/certs/Comodo_AAA_Services_root.pem:

Connect

Click Apply and then establish the connection by clicking on the toggle button:


If you encounter problems creating and configuring the connection, try the program nm-connection-editor, too.

Posted on

Webdav for Linux

Connect to your home folder

Inside your file manager, open the address bar by pressing Ctrl + L.
Enter the address:
davs://webdav.uni-mainz.de/home/ (This will work on most desktops.)
or
webdavs://webdav.uni-mainz.de/home/ (If you use KDE as your desktop environment.)

This opens a login window. Enter your university user name and password.

You should now see your home folder.
The folder is also displayed inside your left overview panel, right click on it to create a bookmark.

Connect to your group folder

You can also connect to a group folder, if you have the rights to access this folder.

Open the address bar by pressing Ctrl + L inside your filemanager.
Enter:
davs://webdav.uni-mainz.de/groups/ [Your Department]/[Name of Group Folder]/
or (if you use KDE.)
webdavs://webdav.uni-mainz.de/groups/ [Your Department]/[Name of Group Folder]/

[Your Department] is normally the number of your faculty.
example: davs://webdav.uni-mainz.de/groups/70/zdv

This opens a login window, enter your university username and password. You should now see your home folder.
The folder is also displayed inside your left overview panel, right click on it to create a bookmark.

Posted on