Students

Prices for Printing and Copying

Since of January 1st, 2023 the following prices apply for printouts and copies made on public printers and copiers operated by the Data Center:

A4 A3 Scanning (A4, A3)
black/white 4 Cent 8 Cent 1 Cent
Colour 18 Cent 36 Cent 1 Cent


Scanning til DIN A3

At all Printers/Copyiers which can scan: 0,01 €/ Scan (A3/A4, b/w, Colour)


Poster Print / Roll-Up

Format  Normal Paper

Picture Paper/

Synthetic-Paper


Flag Fabric/

Self-adhesive Foil


 DIN A2   5,00 €   6,00 €   8,00 €
 DIN A1   8,00 € 11,00 € 14,00 €
 DIN A0  15,00 € 20,00 € 25,00 €
 Special Format  15 €/ m² 20 € / m² 25 € / m²


Poster cutting excess length surcharge:

1,6 m bis 2,5 m Poster length + 2,50 €
 ab 2,5 m Poster length will not be cut, upon aggreement

Note: Posters will be stored for up to three months. If you do not collect them, the posters will be destroyed after three months. The costs incurred will be charged to the client.


Roll-Up:

85 x 200 cm 100 x 200 cm
Roll-Up Print & buying a Stand 110,00 € 125,00 €
Roll-Up- Print  50,00 € 55,00 €
Roll-Up Print & borrowing a Stand    62,00 € 70,00 €

Express Order Poster

Format  Normal Paper

Picture Paper/

Synthetic-Paper


Flag Fabric/

Self-adhesive Foil


 DIN A2 15,00 € 16,00 € 18,00 €
 DIN A1 18,00 € 21,00 € 24,00 €
 DIN A0 25,00 € 30,00 € 35,00 €
 Special Format 25 €/ m² 30 € / m² 35 € / m²

Note: Posters will be stored for up to three months. If you do not collect them, they will be destroyed after three months. You (the person who placed the order) will be billed for any costs incurred.

Poster multiple Print Discounts

The following special prices apply to multiple prints of a single file when printing posters:

Format 1 Copy up  4 Copys up 10 Copys
Normal Paper DIN A0 15,00 € 12,00 € 9,00 €
Normal Paper DIN A1 8,00 € 6,50 € 5,00 €
Normal Paper DIN A2 5,00 € 4,50 € 3,50 €
Picture Paper/Synthetic-Paper DIN A0 20,00 € 17,00 € 14,00 €
Picture Paper/Synthetic-Paper DIN A1 11,00 € 9,50 € 7,50 €
Picture Paper/Synthetic-Paper DIN A2 6,00 € 5,00 € 4,00 €

Note: Posters will be stored for up to three months. If you do not collect them, the posters will be destroyed after three months. The costs incurred will be charged to the client.


Laminating/ Binding

Format Preis
Hot Glue binding of Dissertations, Doctoral Theses, etc. DIN A4   1,50 €
Laminating (small format) DIN A4
DIN A3
  1,00 €
2,00 €
Laminating (big format)
incl. cutting
DIN A0
DIN A1
DIN A2
Sonderformat
15,00 €
9,00 €
6,00 €
15 €/ m²


Learn more: Hot Glue Binding/Softcover-Binding for all Dissertations (german only)

Buissness Cards

100 printed on one side  12,50 €
100 printed on both sides  17,50 €
Posted on

Adding a Printer

Adding a Data Center Printer

If the printer with the name \\jgu-ps-1.zdv.net\Drucken is not listed under availabel printers you need to add it manually. The following procedure should work in all current windows versions. The only requirement is that your computer needs to be inside the universitys domain, connected to its WLAN or connected via VPN.

Click on the Windows button (the button with the flag/window in the bottom left corner on the keyboard.)


Write printer in the input field (User of Windows 8 will not see an input field, just start typing). In the following the procedure will first be described for Windows 10 and secondly for Windows 8:

You will see the option "Printer & Scanner" (System settings). Click on it.

Afterwards an new window will open.

Click on the + symbol (adding Printer & Scanner)

Afterwards all availabale printers and scanners will be listed:

Click on (all the way down under the list of all scanners and printers) "The desired Printer is not listed". An additional window will open:

Set the selection point on choosing freed printer threw the name. In this field you will write:

\\jgu-ps-1.zdv.net\Drucken

Click on continue. The installation will take a second, then following notification will appear: Printer jgu-ps-1.zdv-net was added successfully.

Click on continue. Now you will have the possibility to decide if the added printer should be set as the default printer. Default printer means preselection - the printer which will be chosen at first when you will give a print order.

Lastly click on complete. The printer is now installed.

The input field with the select option Devices and Printers under Windows 8.

Then the select ooption "Devices and Printers" will be shown. Click on it. The corresponding window will open:


Click on adding Printer (1). A new window will open. Now click on wanted printer not listed (2).

In the next window you will select the option choosing freed printer threw the name. In this field you will write:

\\jgu-ps-1.zdv.net\Drucken

Click on continue. The installation will take a second, then following notification will appear: Printer jgu-ps-1.zdv-net was added successfully.

Click on continue. Now you will have the possibility to decide if the added printer should be set as the default printer. Default printer means preselection - the printer which will be chosen at first when you will give a print order.

Lastly click on complete. The printer is now installed.

Note: These instructions are firstly for computers within the domain or which can be found in the PC-Pools. Fundamentally you can also add the printer on your private computer (notebook connected via WLAN or computer via VPN).

Adding Printer on a private Computer

Open the Start menu and search for the Run program.
Start the program and enter the printer name \\jgu-ps-1.zdv.net\Print in the input line.
Confirm your entry. You will now be asked for the username and password of your JGU account.
Enter your username in the format uni-mainz\username.

If another local user is entered, click on more options and
enter the correct username as described above.


Posted on

Software for Students

The Data Center offers the Students of the University of Mainz the possibility to use a broad selection of softwares free of charge in the pool rooms of the ZDV. Employees and students can also access all programs available via → AppV/ZDVApps (including the statistical software SPSS) from their private computer, from home or from the WLAN at the university via a → remote desktop connection.


Employees and Students of the Universitymedicine (UM) please inquire at the Service Center IT of the UM for comparable offers.

Software offers for Students

The following offers are available for students of the University of Mainz:

Microsoft Office365 ProPlus

The campus contract concluded by the ZDV for the University of Mainz makes it possible to provide Office 365 free of charge to members (students and employees) of the university.

💡 Please note that we cannot support all products included in the package. You can find extensive documentation on MS Teams here.

This is the locally installable version of Office. Files can be stored locally on the computer as always, even if cloud storage (OneDrive) is offered.

However, it is not possible to select only individual programs from the Office package. The offer is valid for installation on up to 5 devices, Windows or Apple, including mobile devices (including Android).

The condition for using Office 365 is an active account (for employees or students) of Mainz University. To verify this, you will be asked at regular intervals (monthly) to verify your eligibility via login.

If your account expires (e.g. because you are exmatriculated or have finished your studies), your Office license expires at the same time. From this point on, you can only use your Office installation to view your documents, but you can no longer make any changes to it.

Installing Microsoft Office 365

Note: Execute the following steps on the device on which you want to install office!

1. Open the Website → https://portal.office.com/. Log in with your Universitys Email. If your Email causes an Error try username@uni-mainz.de; only the username and without "students".

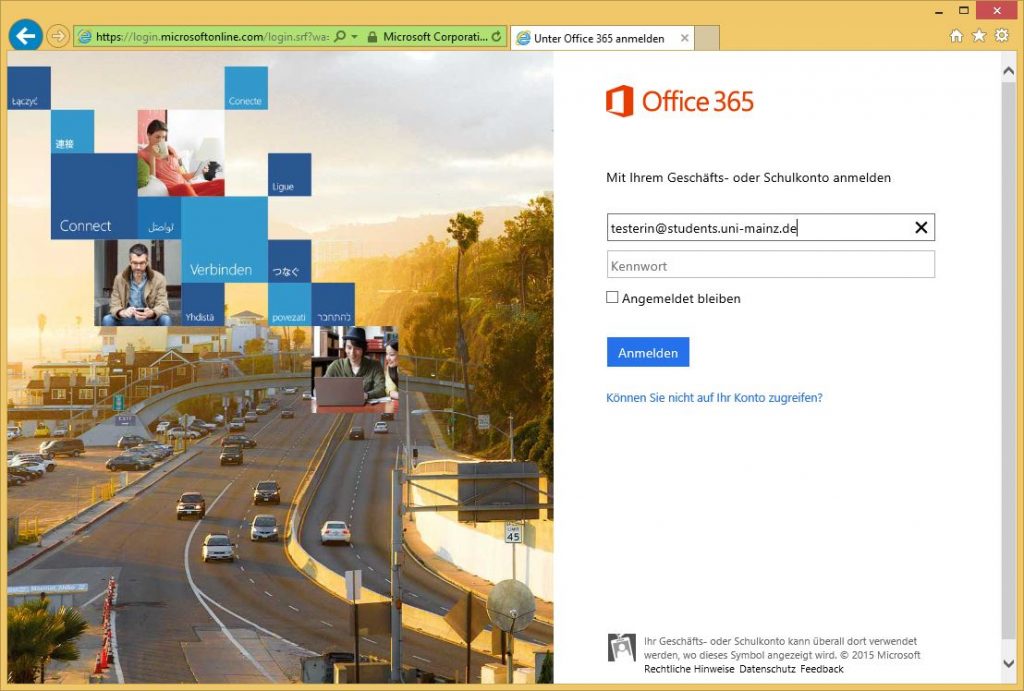
2. You will beredirected the Uni-Mainz loggin page.

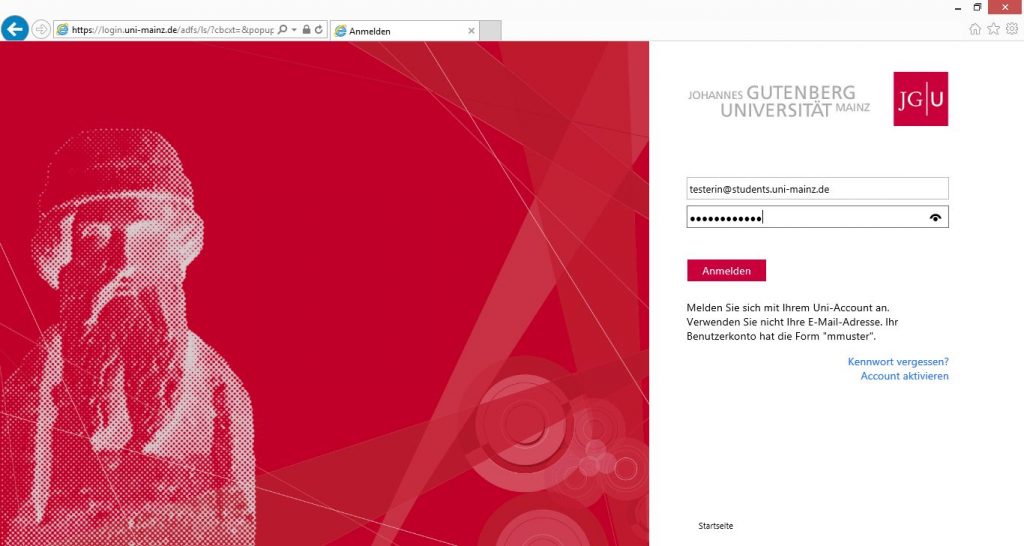
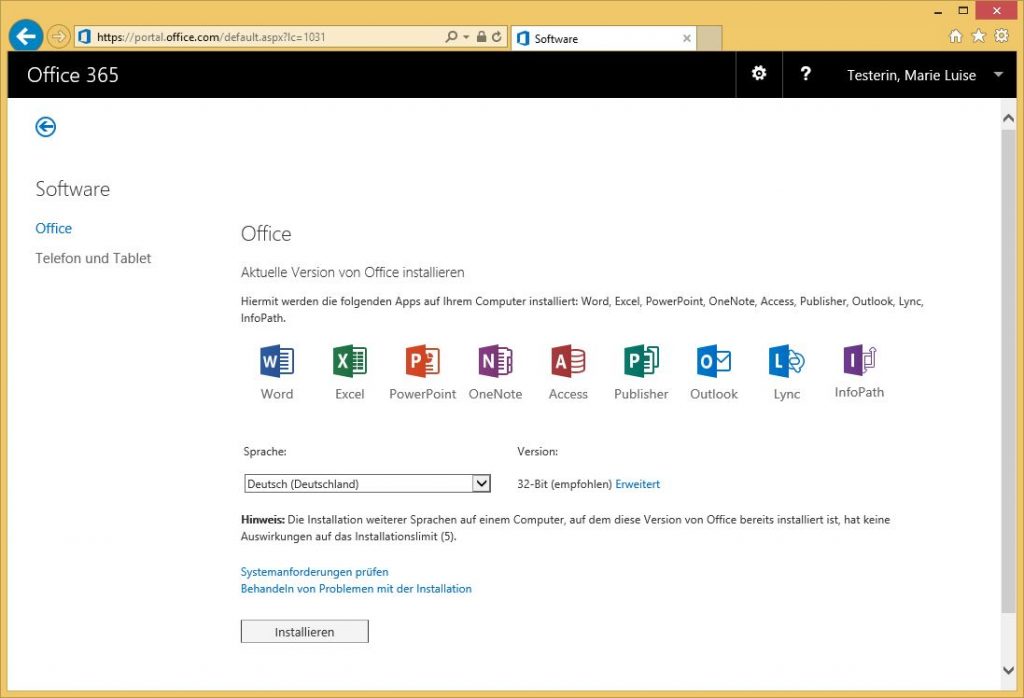
3. After the log in you will reach the downloading page.
4. On the downloading page you can choose between the 32-Bit and the 64-Bit-Version and change the language of the programm to be installed.
5. After clicking on Install you kann download the installation package.

Notes on the Installation under Windows you can find → here.  (german only)
Notes on the Installation under Mac you can find →  here. (german only)

Microsoft Azure Dev Tools for Teaching (former: Microsoft Imagine)

Microsoft offers under the Name of 'Azure Dev Tools for Teaching', former: Microsoft Imagine) additional Software products for the use of private computers  for members of some Majors of the Departments 02, 03, 04, 07, 08, 09 and 10. More informations are on this Website from Microsoft.

Please note that this is not an offer from the ZDV which is why we can perform no support regarding this.

Citavi

Citavi is a literature management program for Microsoft Windows. It is developed by the company Swiss Academic Software, based in Wädenswil near Zurich, and is based on the .NET software platform.

The ZDV has concluded a new campus license of the literature and knowledge management software Citavi together with the University Library for the University of Mainz. The lease has been extended and runs until 31.12.2023.

Eligible for use are employees with an active contract in the University's Human Resources Department, as well as enrolled students of the University. It does not apply to visiting scholars, guest lecturers, guest auditors, and members of external institutions, such as the Leibniz Institute for European History (IEG).

Citavi licenses are person-based and not computer-based. According to the license agreement, you can therefore work with the same Citavi license on both your office and home computers.

With the help of Citavi you can comfortably manage literature under Windows, you can e.g. create bibliographies or automated bibliographies in publications and easily import data from the catalog and database of the university library. A special feature of Citavi is that it offers additional functions for knowledge organization and task planning.
Several thousand citation styles are available in Citavi for literature references.
Citavi can be linked to word processing programs such as Word and Libre Office Writer. Together with the University Library, the ZDV has concluded a campus license of the Citavi literature and knowledge management software for the University of Mainz.

  1. Software offers for Students

Reference

As ZDV-App: You can assign Citavi over → ZDV-Apps  on computers within the domain uni-mainz.

For Compzters outside of said domain, so your own PC, you, as an employee or students, can use the Campus licence.

You want to work with Citavi 6 for the first time ?

  1. Install Citvi 6 for Windows. You will receive the installation file under http://www.citavi.com/download 
  2. Open with your JGU account a Citavi account under http://www.citavi.com/uni-mainz
  3. In your Citavi Account chosse a password Citavi Account
  4. Start Citavi an log in with your Email adress and your new password. Citavi takes over the licence data.

Note: Those videos are helpful the get instructed → http://www.citavi.com/citavi-6-kennenlernen
You will find a short introduction in the users manual: Citavi 6 Manual

You want to change from an older Citavi Version to Citavi 6?

  1. Inform yourself about new developments and changes under http://www.citavi.com/download
  2. Inform yourself about the upgrade process Citavi 6 Manual
  3. Intsall Citavi 6. You can get the instalation data under http://www.citavi.com/download
  4. Open with your JGU account under http://www.citavi.com/uni-mainz  a Citavi account.
  5. In your Citavi account please choose a password Citavi Account
  6. Start Citavi and log in with your email address and your new password. Citavi takes over the licence data from your old account.

You still want to work with Citavi 5?

  1. Install Citavi 5. You can get the installation data under Download | Citavi - Reference Management and Knowledge Organization
  2. Ope with your JGU account under http://www.citavi.com/uni-mainz a Citavi account.
  3. Request a licence key for Citavi 5: Download | Citavi - Reference Management and Knowledge Organization You can find a detailed instruction here: Citavi Support (English)
  4. Copy from your Citavi Account the licence data.
  5. Start Ciavi and click on 'enter licence data'. With the licence key the free version from the campus lease will be changed to the full version.

Note: For introduction videos are helpful:  www.citavi.com/citavi-5-kennenlernen
In the users manual you will also find a short introduction Citavi Manual.

Problems with your Registration and Log in ?

According to the provider there are currently problems with the registration and log in of Citavi 6. On their Website is a collection to different scenaries: Citavi Support (English)

Citavi Introductioncourses

The Universitys library regulary offers Intruductioncourses for use of Citavi.

If you have any other questions do not hesitate to contact us, per Email to software@uni-mainz.de.

Endnote

Further informations you can find here:
https://www.ub.uni-mainz.de/de/faq#literaturverwaltung-citavi-endnote-

For students as well as employees of the Universitymedicine the department offers EndNote licences. The department library of the Universitymedicine supports you with courses and consulting regarding the application of EndNote. You can find all informations under :

https://www.ub.uni-mainz.de/endnote-universitaetsmedizin


Posted on

First steps for new students

Dear freshmen, dear students,

welcome to the Data Center (ZDV). This academic institution of the JGU can be contacted by all members of the university for services in information and communication technology.

In the following we have put together a checklist to help you get started with your studies. However, it is worth taking a look at this page later, as it contains a lot of useful information.

How do I activate the JGU account?

After enrolling for the first time, you have to activate your JGU account once.

The following process must be observed:

Step 1
After your enrollment you will receive an individual link and an activation code via email to your private email address.

Step 2
When you activate your JGU account, you set your personal password. Information on secure passwords is available here: https://www.en-zdv.uni-mainz.de/account-change-of-password/

Step 3
You will find out the login name of your JGU account.

💡 Further information: Account: Activation

What are the characteristics of my JGU account?
    • Disk space size (home directory): 100 GB
    • Mailbox size: 5 GB
    • Email address: loginname@students.uni-mainz.de
    • Print quota
What is my university email address?

Usually your automatically created Uni-Email address is

loginname@students.uni-mainz.de.

How can I check my university emails?

Simply log in with the access data of your JGU account at https://mail.uni-mainz.de/.

💡 Tip: Check your emails very regularly - ideally every day! There you will be informed about dates and deadlines and your lecturers will also assume that you can be reached in this way.

Further information on the subject Email

Digital Semester Ticket

Since the summer semester of 2024, JGU students have been offered the nationwide Deutschlandticket, replacing the former semester ticket.

  • The Deutschland-Semesterticket can be used via the so-called campus portal, which is provided by Mainzer Mobilität.
  • It is possible to load the Deutschland-Semesterticket into the wallet of your smartphone. Unfortunately, printouts or screenshots are not valid, and it is no longer available in the JGU ID card app.
  • Only valid in combination with an identity card/foreign passport
  • The Deutschlandticket is valid:
    • For the summer semester from April 1st to September 30th
    • For the winter semester from October 1 to March 31
    • Before the start of a new semester, you must verify yourself again in the Mainz Mobility campus portal in order to be able to use the Deutschland-Semesterticket in the following semester. Please note that you will not have a valid ticket without this verification.

💡Access to the campus portal and information on how to use your Deutschlandticket can be found on the following page → https://www.studium.uni-mainz.de/deutschland-semesterticket/ (german only)

Library Card
  • With your JGU account, you will automatically receive a virtual library card and a PIN.
  • Like your student ID card and semester ticket, your library card will be displayed in the JGU ID card app.
  • You will need the PIN to borrow and return items at the University Library's self-checkout machines and to print and copy on public devices at the university.
  • https://www.ub.uni-mainz.de/en/faq#library-card
Semester Timetable 
  • after registration in the JGU, it is possible to display the timetable filtered by semester
  • Information on the courses (lecturer, type of course, first and last date, registration status) comes from JOGU-Stine and is constantly updated
  • Linking of the timetable with the room search (by clicking on the room number you will be redirected to the campus map, on which the location of the course is now displayed).

More Information JGU-App I JGU-Id-Card-App

What platforms are there and what are they used for?

Webportal JOGU-StINe

E-Learning-Plattform Moodle and ILIAS (for e-exams)

💡 Tip: It is best to check before the start of the lectures, but also regularly during the current semester, whether materials are available for your events. Many teachers expect you to prepare yourself for the event, even for the first session.

The following applies to all e-learning platforms: Do you need access to a course, are you missing course materials, or do you have questions about the content? Then please contact the relevant teacher directly. The technical support cannot help you with questions about the content, as these are created by the lecturers.

Which network do I have to choose?

Please select the Uni-Mainz network.

How do I connect?

There are various instructions for setting up your Internet connection on campus for the various operating systems and end devices (PC, smartphone, ...): Network Uni-Mainz

With the JGU account of the University of Mainz, you can use the eduroam wireless LAN as a guest at other universities in the eduroam network.

Remote desktop connection

What is remote desktop connection?

In order to be able to use resources of the University of Mainz when working outside the campus, the Data Center offers the remote desktop server.
In short: You sit in front of your own computer at home (or anywhere else) and connect to the server at the Data Center via a remote desktop connection. The working environment of a pool computer is then essentially displayed within a window on the local computer - including all software available there and access to your own files.

How do I set up a remote desktop connection?

There are different instructions for setting up your remote desktop connection for the various operating systems and end devices (PC, smartphone, ...):

VPN

What is a VPN connection?

If you use an Internet connection via a third-party provider (e.g. your DSL provider) or from a third-party network (e.g. at a conference), then you are "outside" the university network. The computer you are working on is then initially not part of the uni-mainz.de domain. However, access to certain research services of the university library and full-text editions of electronic journals is reserved for members of the university and users on campus.
Via the so-called Virtual Private Network (VPN) you can authenticate your local computer as a member of Johannes Gutenberg University Mainz.

How do I set up a VPN connection?

There are different instructions for setting up your VPN connection for the various operating systems and end devices (PC, smartphone, ...):

JGU gives you a printing and copying credit of €1.50 for each semester.

Before you print, copy or scan at JGU, you must take note of a few points.

  • Create a PIN once at a service terminal or in your print and copy account.
  • Log in with your user name and password of your JGU account.
  • Top up the Studierendenwerk app with credit and then transfer your credit to your print and copy account at a service terminal.
  • Log in at printers and photocopiers with the username and password of your JGU account.
What is my print account?
  • virtual account
  • connected to the JGU account
  • view your current balance and history of print, copy and scan jobs
  • Access: print and copy center

How can I add money to my print account?

How do I get print jobs from a PC to a university printer?
How do copying and scanning work on a university printer?

At the university there are different printer models with different functions
The following link contains an overview of the functions under device types:

The JGU enables all members of the university to use various software through existing 'campus licenses'.

How do I get software?

Further information:

How do I contact the ZDV hotline?

If you have any questions, please do not hesitate to contact our team on the Hotline by email, by phone or personally during office hours.

The hotline is located in room 00 151 next to the DTP studio on the ground floor of the Faculty of Natural Sciences (NatFak), Johann-Joachim-Becher-Weg 21.
Advice takes place Monday to Friday from 9 a.m. to 6 p.m. currently by email or phone:
      • by email to hotline@zdv.uni-mainz.de (if possible, please choose this option). If you send us an email, please do so from your university JGU account. So that we can help you quickly, please give us as much information as possible in your email - the operating system, programs used, error messages, etc. are important information that we would otherwise have to ask for separately.
      • by phone: within JGU: 2 63 16 otherwise: +49 6131 39 26316

However, many questions can be answered by browsing the ZDV website or by using the search function (top right).

We wish you every success in your further studies!

Posted on

Group Directories

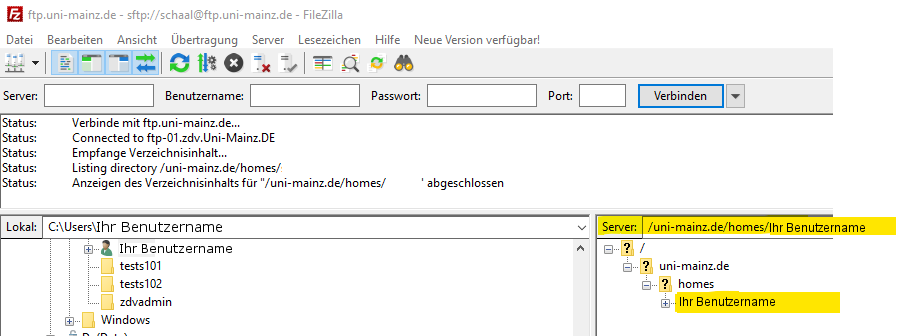
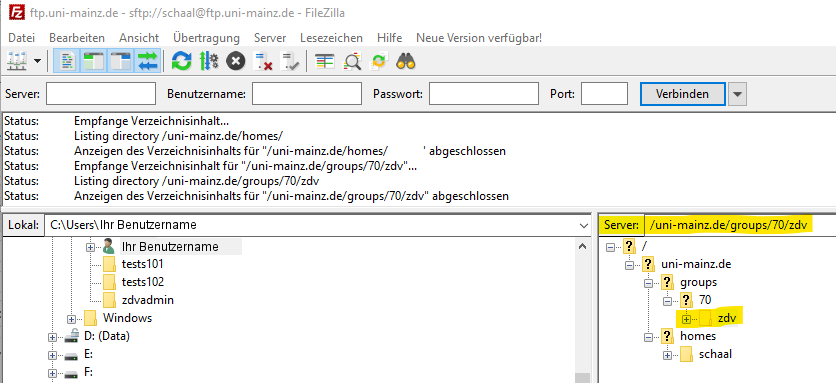
Do you need central file storage space to be used together with any number of other members of the university? Then group directories could be your solution! They can be used free of charge by all members of the university.

A new group directory may be ordered by the director of an institute/faculty or the head of a study group via email to: → system@uni-mainz.de .

In your mail please mention:
- The name of the faculty
- The name of the institute
- The name of the study group
- The name of the head of the study group
- The names and accounts of the people that need access to the group directory
- The name and account of the main responsible contact person

General Hints

There are different ways of accessing group drives, depending on the operating system of your computer or whether you are inside or outside the network/domain uni-mainz.

You must know the exact designation (= the name) of your group directory and the area of ​​the group drive. You can obtain information on this from your local administrator or from the Data Center hotline.

The areas are department-related, e.g. 01 (FB01), 02 (FB02), ... or special groups such as 70 (ZDV, UB, ...)

The groups with access authorization are managed via the interface provided at https://account.uni-mainz.de (permissions item). Please log in there with your username and password.

1) Have members of the Authorized Access (Write) group
read and write access to the corresponding group drive. In order to
Changes to this group must become active for the users for which
Changes were made to log in and out once each, since only
the group memberships of a JGU account are evaluated when logging in.

2) Members of the group "Group drive administrators" can use the
corresponding authorized group (see point 1) and the
Manage management group yourself. To access the group drive itself
access, however, they themselves must also be a member of the group mentioned under point 1
be group. Please maintain at least one in this administration group
representative.

Group Directory for Windows 10 - Within the Domain uni-mainz

Open Windows Explorer using the following keyboard shortcut: Windows key + E.
Then, in the on column the left, right click on 'Dieser PC", then click on 'Netzlaufwerk verbinden':

In the following window under Laufwerk please choose a drive letter that is not in use yet.

Please enter the following into the input box Ordner:

\\uni-mainz.de\dfs\groups\[your sector]\[your group directory]

Example: \\uni-mainz.de\dfs\groups\70\zdv
takimata sanctus est Lorem ipsum dolor sit amet.

Group Directory for Windows 8 - Within the Domain uni-mainz

Open Windows Explorer using the following keyboard shortcut: Windows key + E.
In the menu, click on Computer, then click on Netzlaufwerk verbinden.

In the following window under Laufwerk please choose a drive letter that is not in use yet.

Please enter the following into the input box Ordner:

\\uni-mainz.de\dfs\groups\[your sector]\[your group directory]

Example: \\uni-mainz.de\dfs\groups\70\zdv

Group drive on Windows - from outside the domain

If you want to access a group drive with a Windows machine from outside the domain, the path is (what you enter in the "Folder" field):

\\fsgroups.zdv.uni-mainz.de\groups\groups00 [your group directory]

- instead of 00 there is the corresponding number of your area (see above)!
In the example above that would be:

\\fsgroups.zdv.uni-mainz.de\groups\groups70\zdv

Important note: if you want to access a group drive from outside the domain, this is only possible if you first create a → VPN connection.

If you are using a different account than the Uni account on the PC you are connecting from, it is important to connect with different credentials/username. Activate the corresponding check mark (Windows 7) or click on "different login name" (Vista) and enter your username in the form uni-mainz\loginname and your password.

Group drive via FTP - from outside/from non-domain machines

You can also connect to an existing group drive via FTP. To do this, use an encrypted connection to the FTP server of the data processing center (explicit FTP via TLS, FTPES).
The server is called ftp.uni-mainz.de.
Enter the directory path for the server:

/uni-mainz.de/groups/[area]/[your group directory]

Here you will find - as an example - the configuration of an FTP connection to the group drive
/uni-mainz.de/groups/70/zdv/
for the FTP client 'Filezilla'. First open the server manager via File -> Server Manager:


Sie können auf diesen Screenshot klicken, um ihn größer anzuzeigen
You can click this screenshot to view it larger

Then configure a new server there via New Server as shown in the image below (IMPORTANT: in the 'User' field type your login name, the JGU account name of your JGU account):

Sie können auf diesen Screenshot klicken, um ihn größer anzuzeigen
You can click this screenshot to view it larger

In the first step, after successfully entering the password for your JGU account, a click on Connect establishes the connection to your home directory:

Sie können auf diesen Screenshot klicken, um ihn größer anzuzeigen
You can click this screenshot to view it larger

In the next step, you can change the path in the 'Server:' field to get to the group drive. In the example below it is the group drive of the Dara Center:

Sie können auf diesen Screenshot klicken, um ihn größer anzuzeigen
You can click this screenshot to view it larger

The next time you call it up, you can quickly restore this connection using the arrow next to the server manager icon:

If you still have storage space for a personal website (this has not been set up since June 13, 2018), you can access the appropriate storage space with the following path information:
As an employee: /uni-mainz.de/public/www-ma
As a student: /uni-mainz.de/public/www-stud

Mount group drives under MacOS

You can find this information on the page »Use group drives under macOS«.

Group Directory for Linux

From Linux desktop systems (like → ZDV Linux) that are connected to the central user management and to home directories, you may access group directories using the following file directory paths:

/uni-mainz.de/groups/[your area]/[your group directory]
Example: /uni-mainz.de/groups/70/zdv

If you are, for example, using Nautilus as a graphical file manager, you may press STRG + L and then enter the file directory path directly.

Posted on

For students: Activate JGU account after first enrolment

After your initial enrolment, you must activate your JGU account once.
The following process must be followed:

Step 1: After your enrollment, you will receive an individual link and an activation code via email to your private email address.

Step 2: During the JGU account activation, you define your personal password. Information on secure passwords can be found here: https://www.en-zdv.uni-mainz.de/account-change-of-password/.

Step 3: You will be told the user name of your JGU account. This will be sent to you by email.

Posted on