
Log in
- Before you log on to a device, send your print jobs from the computer to the printer \\jgu-ps-1.zdv.net\Print. If the printer is not selectable, you must first add it.
- If the display now shows release print jobs, you can select and release your job from the list on the display.
- If the display shows ready to copy and the functions for copying, tap the Applications button to the left of the display or, depending on the model, the Home button.
- The Papercut interface now appears on the display; tap the Papercut button. You should now be able to view and select your print jobs as usual.
Notes
- Print jobs that you have sent to \\jgu-ps-1.zdv.net\Print can be printed on any printer/copier operated by the ZDV on campus.
- Color prints can only be printed on printers that can also print color, A3 only on A3-capable printers.
- Unfortunately, printing on film or cardboard is not possible due to the high error rate.
- At https://drucken.zdv.net you can view your print jobs that have been sent but not yet printed under the menu item latest print jobs and also check the costs for each print job before approving it.
Add Data-Center Printer
If the printer with the name \\jgu-ps-1.zdv.net\Print does not appear in the list of your available printers, you must add it manually.
Requirements
- Your computer is located in the university's domain or WLAN or is connected via VPN.
- In principle, you can also add the ZDV printer on your private PC (notebook in the WLAN or PC with VPN at home).
Adding a printer under Windows
1. Tap the Windows key on the keyboard (the key with the little flag/window at the bottom left of the keyboard)
2. Write Printer in theinput field.
3. Click on the selection Printers & Scanners (system settings) displayed.
4. A new window then opens.
5. Click on the + add Printer & Scanner icon.
6. All available printers and scanners are then listed.
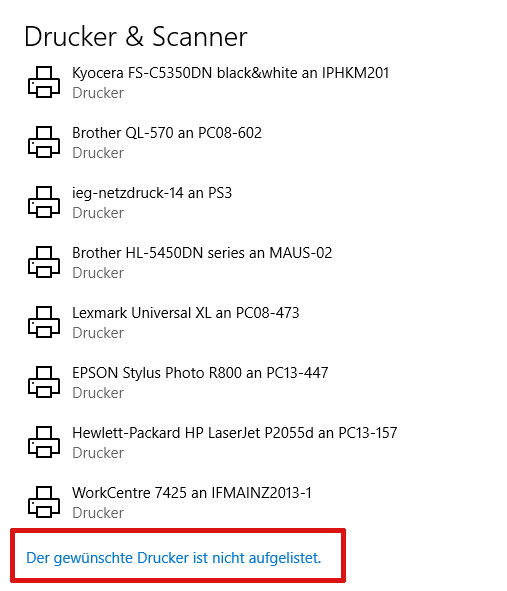
7. Click below the list of all scanners and printers on The desired printer is not listed. Another window opens.
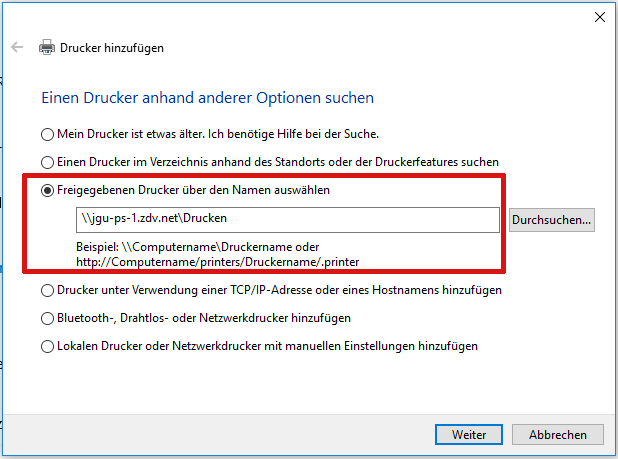
8. Select Shared printer via Select name. Write in the field: \\jgu-ps-1.zdv.net\Print
9. Click on Next. The installation of the drivers takes a moment, then the message appears: Printing to jgu-ps-1.zdv-net has been added successfully.
10. Click on Next. You can now decide whether the printer you have just set up should be set as the default printer. Default printer means preselection - the printer that is selected first when you give the print command in a program.
11. Finally, click on Finish.
Adding a printer on a private PC
- Press the Windows key on the keyboard (the key with the little flag/window at the bottom left of the keyboard).
- Enter run in the input field. Open the app.
- Enter the printer name \\jgu-ps-1.zdv.net\Print in the input line.
- Confirm the entry.
- You will be asked for the username and password of your JGU account.
- Enter your user name in the form uni-mainz\username.
- If another local user is entered, click on further options and enter the correct user name as described above.
Logging Off
Depending on whether you have just printed or copied something, the logout process is slightly different. However, it is important that you log out, otherwise other users can copy at your expense. You will be automatically logged out after a certain time, but that could be too late!
The basic rule is
Log out of copying with the "real" buttons. To do this, press the logout button on the right above the numeric keypad
Log out of printing via the display. Tap the logout button on the display.
Notes for JGU-Employees
JGU employees can print and copy on the public printers/copiers for business purposes. Billing takes place via the ZDV-Shop or invoices are issued for employees of the University Medical Center.
The billing object/cost center is assigned to your JGU account. To log in to the copier, you need a card + PIN. This is basically the same as entering your user name and password, but is much quicker.
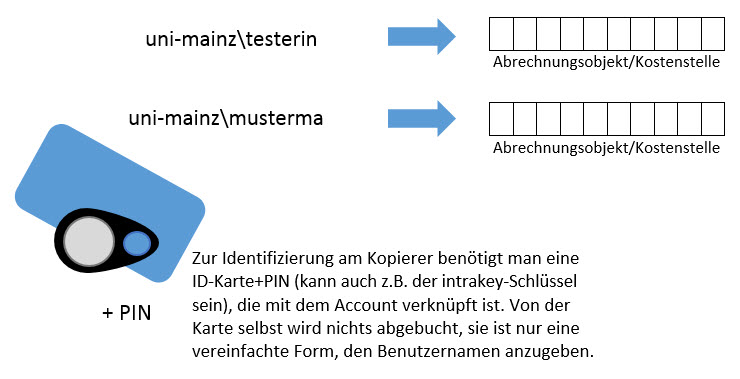
The billing object/cost center is assigned to your JGU account. To log in to the copier, you need an ID card + PIN.
Each user can have several accounts: One for paid-in credit and one or more billing objects/cost centers. The user can set which account is to be debited (the paid-in credit or a business account) at any time at https://drucken.zdv.net/abrechnungskonto. Once set there, the selected setting for printing and copying applies until another setting is made!
Please note: The paid-in credit is always selected as the default!
New employees who wish to print for work-related purposes at the university must first submit a request for a settlement object/cost center.
Employees
- Log in to the JobRouter application: https://digitale-dienste.uni-mainz.de/jobrouter/
- Click the plus sign in the top-left corner. Under General, select the field Aply for ZDV services.
- Fill out the form and click Send.
- We will process the requested assignment. This may take 2–3 days.
- Select the requested settlement object/cost center at https://drucken.zdv.net/abrechnungskonto.
- Save your entry. The setting remains in effect until you make a different selection.
External Users and Students
- Please fill out the application: https://download.uni-mainz.de/zdv/Antrag_Kontenzuordnung.pdf
- We will make the requested assignment. This may take 2–3 days.
- Select the requested settlement object/cost center at https://drucken.zdv.net/abrechnungskonto.
- Save your entry. The setting remains in effect until you make a different setting.