Net access

Remote Desktop – Working from an Off-Campus Workplace

Please note: Some of the links below lead to pages in German, as work on the English version is still in progress. We apologize for the inconvenience.

Work at Home - Using Software of the Data Center


The Problem

  • I need to work with software that is installed by the Data Center - but I am sitting at my computer at home where that software is not installed.
  • I want to use software installed on my workplace computer - but I am currently at a conference abroad.
  • I am at home but I urgently have to work on a file located in a group directory.
  • I need access to certain research services of the university library, as well as full text editions of electronic journals that are only available to members of the university and users on campus.

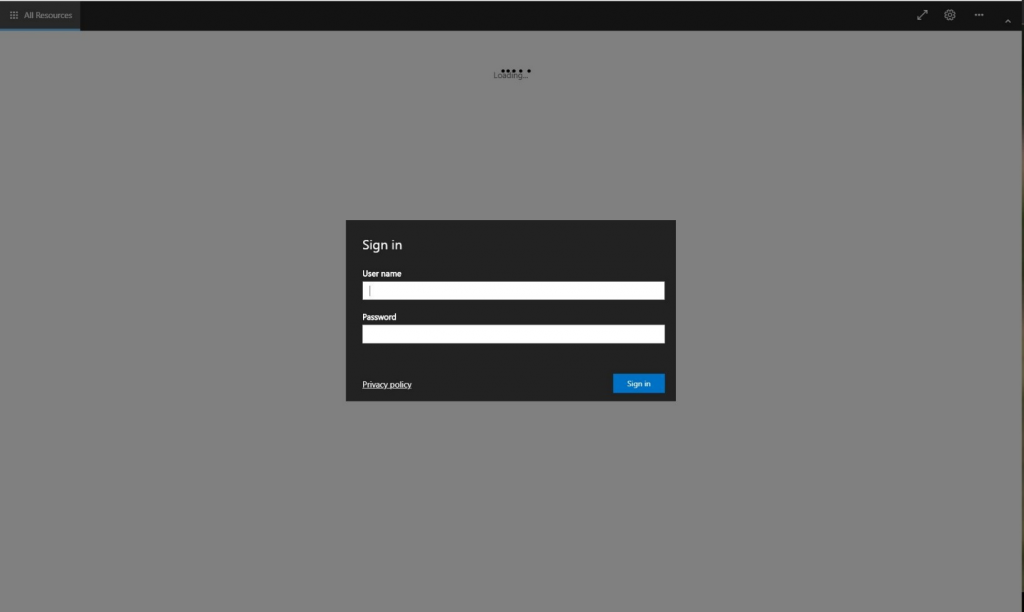
The Solution: Remote Desktop - Working from an Off-Campus Workplace

In order to be able to use the resources of the university of Mainz while working outside of the campus the Data Center offers remote desktop servers. In short: you may sit at your computer at home (or anywhere else) and connect to a server at the Data Center via a 'remote desktop connection'. Essentially, this means that the working environment of a pool computer on campus is displayed inside of a window on your local computer (the one in front of you) - including all the software and data access features of the pool computer. Members of staff will be able to use almost all features of their workplace computer.


Important rules for working with remote desktop connection

  1. It's all about fairness. Using a remote desktop connection, many users are working simultaneously, sharing ressources. Obviously everyone needs use those ressources responsibly.
  2. It is not allowed to run programs other than those provided by us on the remote desktop servers. Failure to comply will result in exclusion from the use of the remote desktop servers. The ZDV usage rules apply.
  3. Store your own data in the home directory only. The desktop is not part of the home directory. Files located on the desktop are not backed up!

More Information 

Home Directory: Your personal Storage Space

Regulations for use

How to establish a remote desktop connection

HTML-5 capable are among others newer versions of Chrome, Edge, Firefox, Safari, ...
Open the page with an HTML-5 capable browser:
Log in with your JGU account: uni-mainz.de\username.
After logging in, you will be shown exactly which remote desktop servers you (the logged in user) are authorized for. By default these are
      • for employees: RDS EMPLOYEES
      • for students: RDS STUDENTS
      • for guests: RDS GUESTS
      • for members of the university medicine: RDS UM
For employees, additional, specialized RDS can be displayed if the corresponding rights are available.
The desired RDS is selected by clicking on it. The following query appears:
If you set the appropriate checkmarks here, you can during the following session
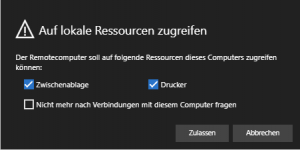
      • copy/paste text between your local computer (where you are currently working) and the remote desktop, and
      • print PDF files that you open on the remote desktop to your local printer (this only applies to PDF!).
"Do not ask for connections with this computer again" sets the made decision permanently (for all following sessions).
Clicking "Allow" establishes the connection - after a short waiting period you will see the remote PC's interface in your browser window.

Note: Minimizing the browser window DISCONNECTS the session!

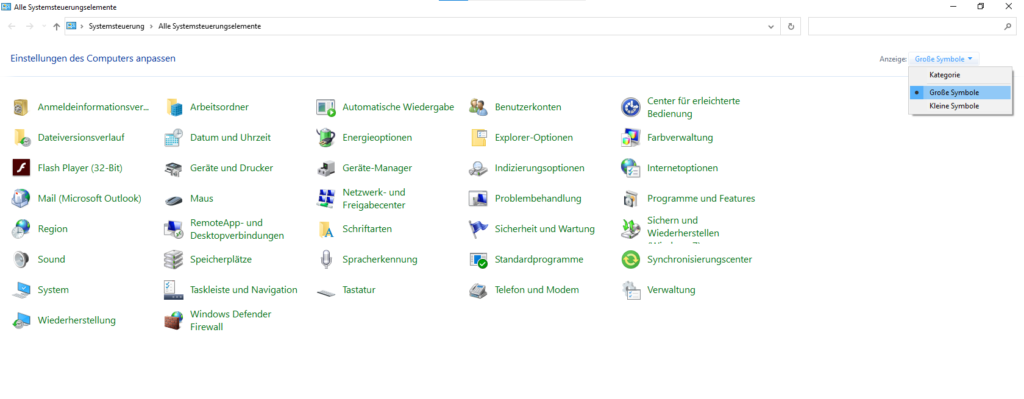
You can find the associated app in the Control Panel:
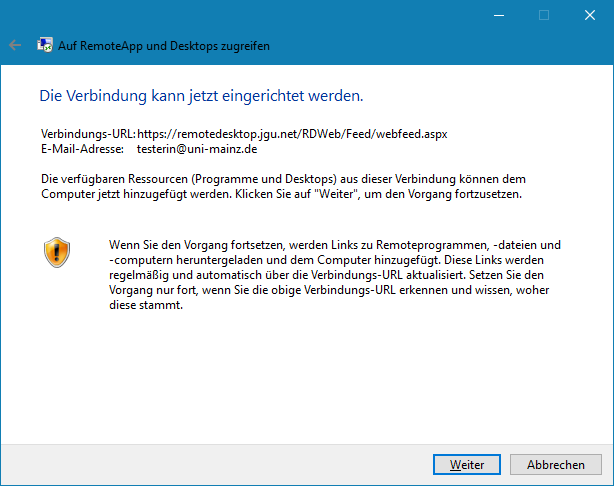
Windows Start menu > Control Panel (type "Control Panel" in the search box) > All Control Panel Items ("Display:" change from category to "Large or Small Icons") > RemoteApp and Desktop Connections > Access RemoteApps and Desktops.

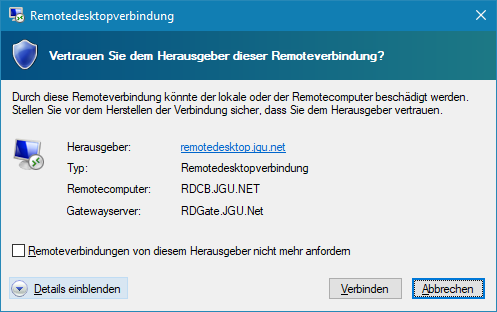
Note: When connecting for the first time, an .rdp file is created. This file will be displayed later in the start menu. When reconnecting, you can then simply click on this start menu entry to call up the remote connection again.

To establish the connection, enter your user name followed by @uni-mainz.de.
A note (The connection can now be set up) is displayed:
After clicking on Next, the login data will be requested (the window displayed here looks as if you have already entered an incorrect combination of user name and password - this is normal at this point!). Enter the corresponding data for your JGU account, the user name should be preceded by uni-mainz\ here.

Establishing the connection may take several minutes the first time.
A remote connection established in this way can be called up again via the Windows Start menu:

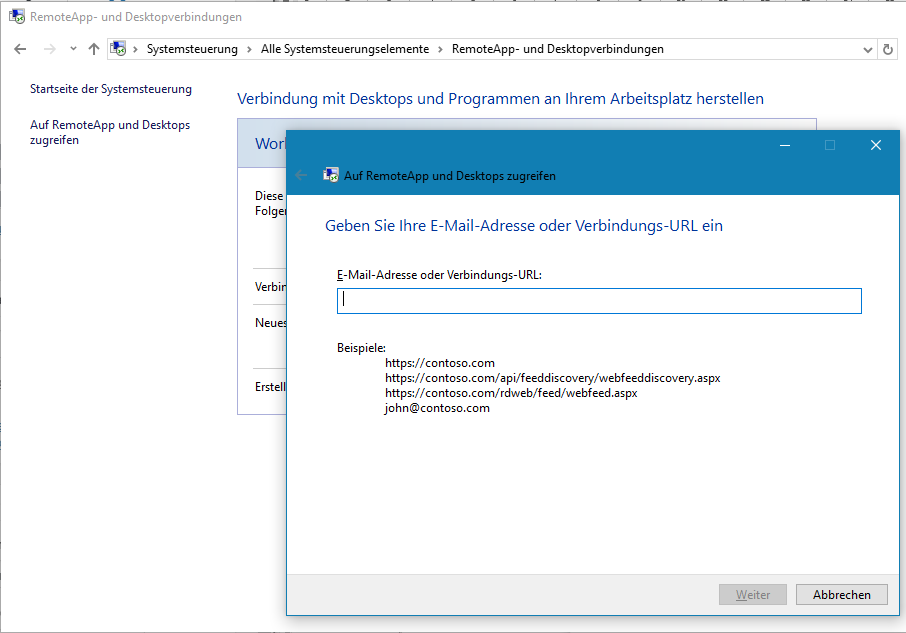
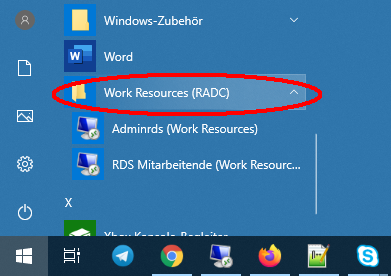
Note: When connecting for the first time, an .rdp file is created. Later you can recall the remote connection by clicking on this file.


Call the following address:
https://remotedesktop.jgu.net/RDWEB/PAGES
The browser window will now ask for the login data:
After logging in, you will be shown exactly those remote desktop servers for which you (the logged-in user) are authorized. By default these are
      • for employees: RDS EMPLOYEES
      • for students: RDS STUDENTS
      • for guests: RDS GUESTS
      • for members of the university medical staff: RDS UM
For employees, additional, specialized RDS can be displayed if the corresponding rights are available.
Click to select the desired RDS, then download .rdp file and open it.
Confirm the security prompt:
In the next window, enter your user name in the form
uni-mainz.de\username.
Establishing the connection may take several minutes the first time.

Connecting to a Linux-Server

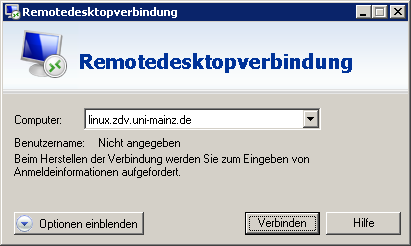
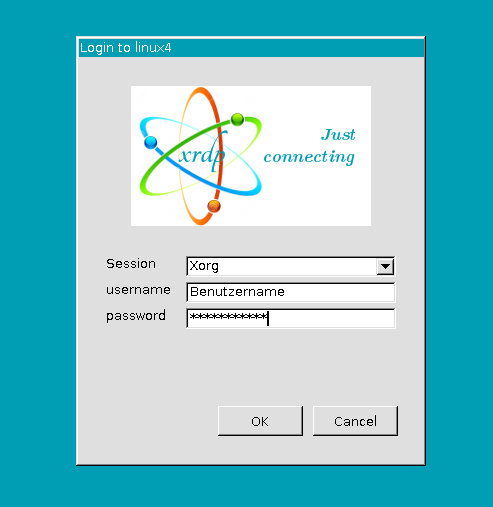
To connect to Linux open the remote desktop connecion and type in the adress linux.zdv.uni-mainz.de.

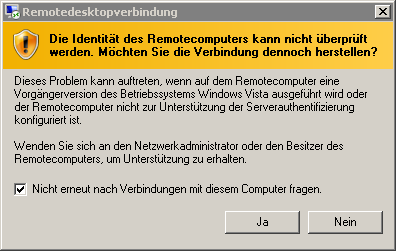
A warning message appears. Set the hook and click on Yes.

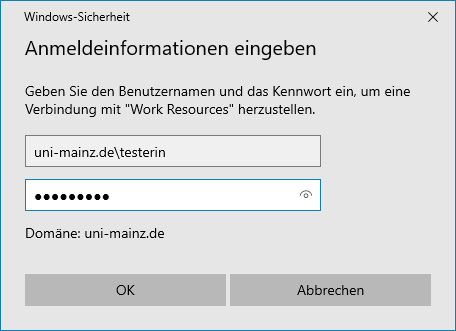
In a new window type in your username and password. Click on OK.
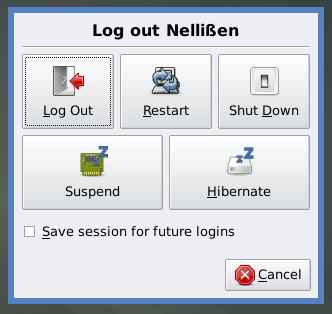
Logging out
If the connection is seperated unexpectedly it can cause problems with the next connection set up. Please log in over the operating system.

For this please click on the top right on Applications and the on Log Out.

Now in the new Window click on Log Out.

Software

You can use different softwares to connect to a remote desktop.

  • Remmina (recommended) offers more setting options, but must be installed first.
  • Vinagre is already installed on the Linux installations of the ZDV.

Remmina

Connection Set up

First click on +.

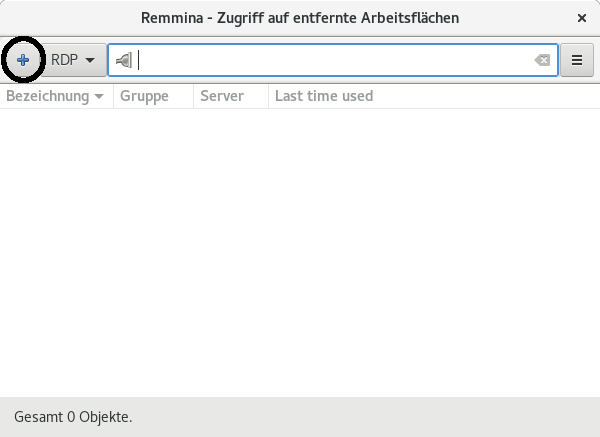
A new Window will open.

Please typ in the following figures:

Name: Choose a name

Protocol: RDP (select)

Server: linux.zdv.uni-mainz.de

Username: Your username

Color depth: As needed. (The higher you set the value, the better the colors will be displayed. However, more data will be transferred).

Click on the Advanced tab.

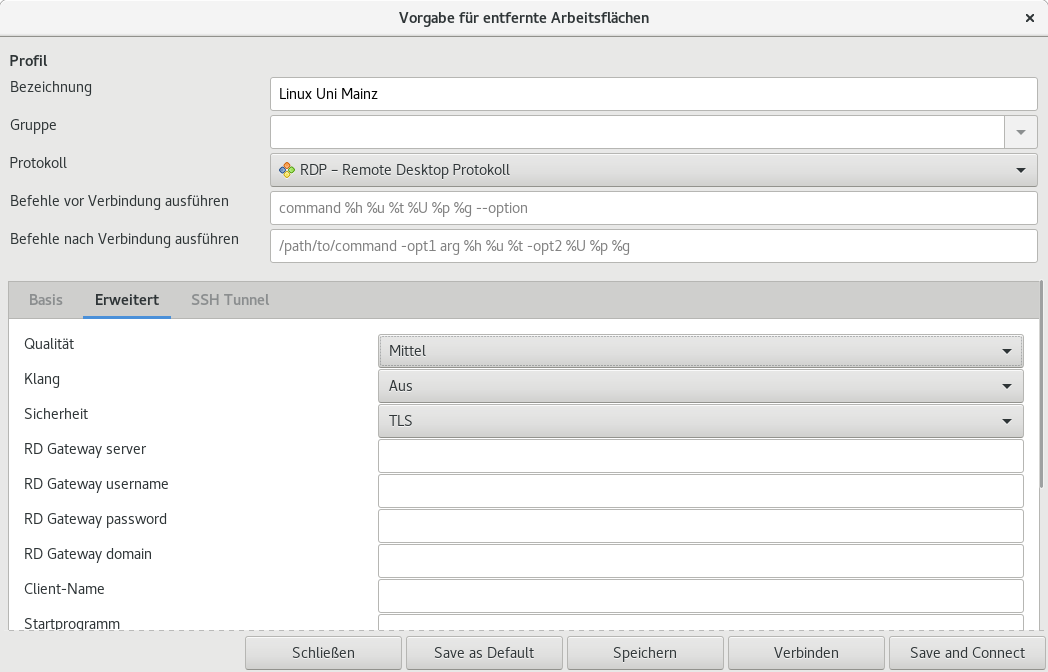
Choose TLS with the safety option.

Häkchen bei Glyphen-Cache setzen

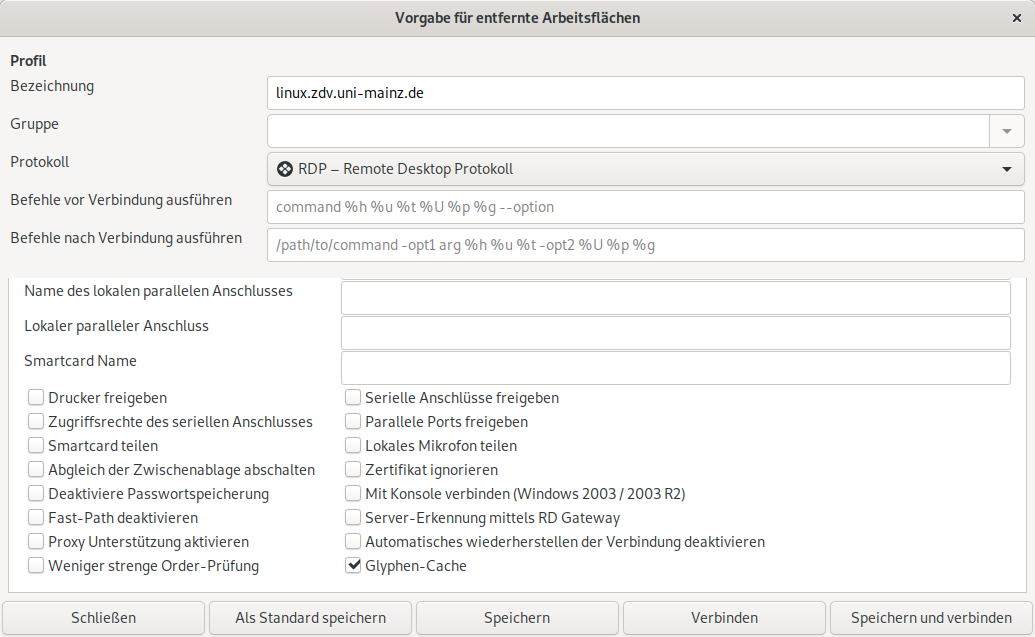
Scroll all the way down and set he hook at Glyphen-Cache.

After click on save.

Set up your keyboard

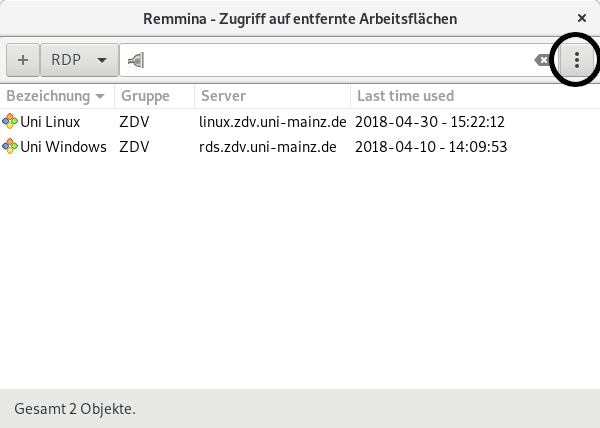
By default, the keyboard is set to English after connecting. To change the keyboard click on the three dots at the top right of the window.

In the list click on settings.
A new window will open, click on the upper bar on the tab RDP.

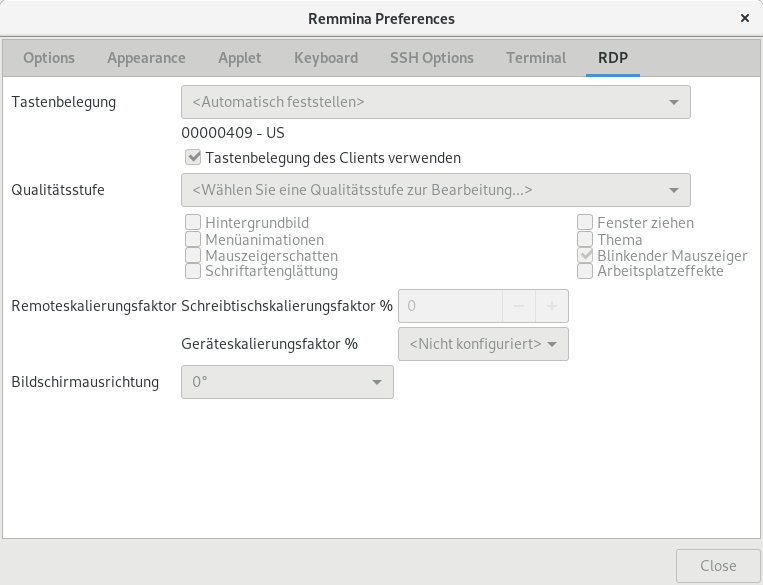
Set the hook at use of the clients key assignment.
Like that the keyboard layout of your local PC will be used.

Connect

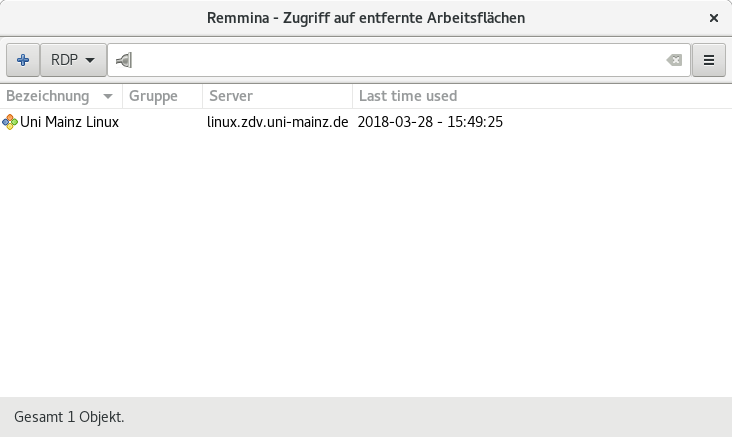
With a double tab on the existing entry the connection will be established.

On the Loggin surface please put in your password.
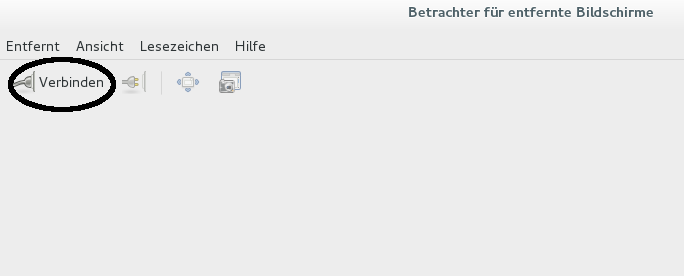


Vinagre

After accessing the application click on connect at the top left.

A window will open.

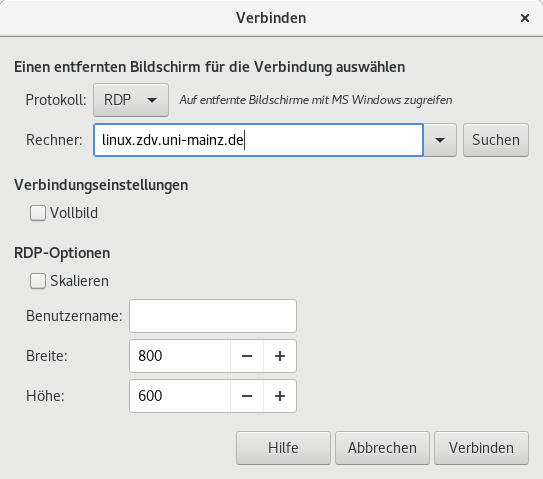
Please put in the following figures:

Protocoll: RDP (select)

Computer: linux.zdv.uni-mainz.de

Username: can stay empty

Optional you can change the size of the Window over the width and height.

After click on connect.

After the connection is set up, the Login window will appear.

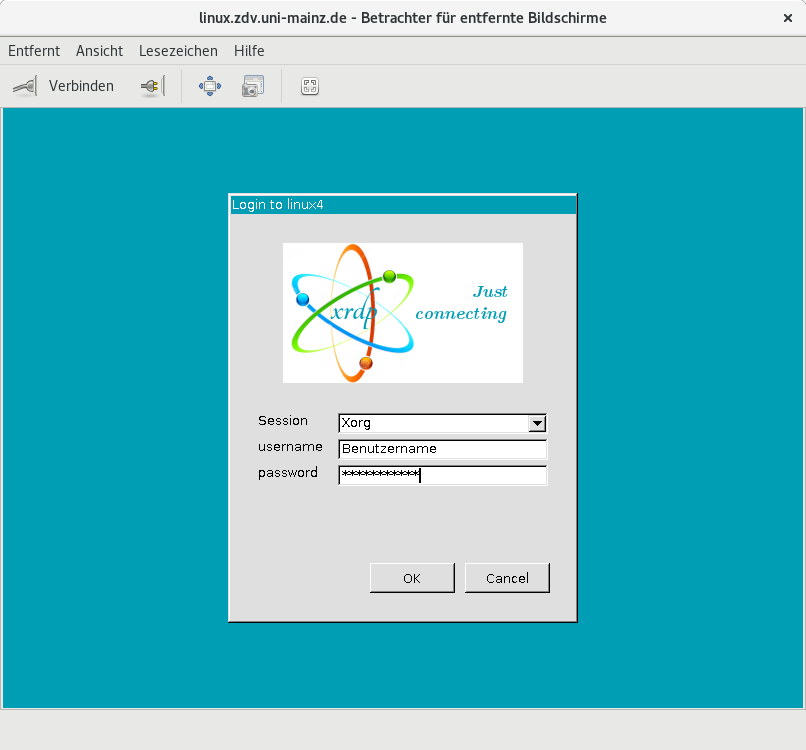
Here put in the following:

Username: username
Password: your password

After click on OK.

Loggin out

If the connection is seperated unexpectedly it can cause problems with the next connection set up. Please log in over the operating system.

For this please click on the top right on Applications and the on Log Out.

After click on OK , in the new Window.

Posted on

Net Access from Outside of Campus via VPN

Please note: Some of the links below lead to pages in German, as work on the English version is still in progress. We apologize for the inconvenience.

In exceptional cases it may be necessary to authenticate your local computer via an additional network service: the so-called  'Virtual Private Network' (VPN) as a member of the Johannes Gutenberg University Mainz.

This applies to certain download areas and access to the directory 'uni-mainz' via the FTP server of the Data Center.

Access to e-books, e-journals and databases of the university library

In the future, you will only be able to access the University Library's e-books, e-journals and databases via VPN, regardless of whether you are working from home or on the university's Wi-Fi network.

Access without VPN will continue to be possible for stationary PCs at JGU workstations that are operated via network cables, as well as for research PCs at the University Library locations.

Most publishers also allow you to sign in using single sign-on.

To learn more

FAQs of the University Library : https://www.ub.uni-mainz.de/en/faq#account-wi-fi-access-to-electronic-media

Single Sign On: https://www.en-zdv.uni-mainz.de/2023/02/01/single-sign-on-log-in-once-and-access-all-applications/

Configuring your operating system

After configuring your operating system with the relevant driver you will be able to use VPN. The link to the download site for the driver, as well as hints for configuring your operating system may be found in one of the following documentations:


Instructions for non-Windows operating systems may be found within the collections of documentations specific to the following operating systems:

Mobile devices using Adroid
Instructions for the macOS operating system (in German)

Instructions for Unix Operating Systems


Posted on

Net Access from PC Workplaces

Please note: Some of the links below lead to pages in German, as work on the English version is still in progress. We apologize for the inconvenience.

All buildings of the university are wired in a structured way (with constraints at the tower building at the Augustusplatz). Almost all rooms have ethernet network sockets.

We recommend the following sequence:


  • Get a JGU account, if you do not already have one. This enables all members of the university to:
    • use an email address of the following form: loginname@uni-mainz.de
    • use all services of the Data Center from outside of the campus (at home, on conferences ...).
  1. Check if the socket is activated. To do this, please fill in the following → application form for activation of a network socket and send it off.
    • If the socket is already activated, you will be notified about this in the lower part of the answer to your application.
    • If the answer states that your application is being worked on, then a member of staff of the Data Center still has to connect your socket to the campus network. After that has happened you will be informed about this via e-mail. The following steps may be approached beforehand:
  2. Find the address of your network card.
  3. If necessary, install the network card inside your device.
  4. Connect the network cable of your device with your wall socket:
    • cables and other network components are available at the helpdesk and may be payed with the copying card of your institute (Schomäcker card, for university members only).
  5. Proposal of a name and registration of the physical address in order to receive an IP address for the device: → application form for an IP address.
  6. Configure the device for use at the university: obtain the IP parameters automatically from the network. In order to check this, please see → server addresses for computer configuration.
Posted on

Net Access Via Cable in Public Rooms

Information about the Login System

Using the login system you may connect your own notebook to the internet at any activated network socket on campus (for example in the corridor on the ground floor of the natural sciences institute building), as well as within all of the wireless network access areas.

Connecting via Wireless LAN

For this you need to have a WLAN card in your device.

Connecting via a Network Plug

For this you need to have an Ethernet network card in your device that has a fitting (RJ45) connection.

Preparing Your Device

This requires the following configurations: in the system administration below network connections choose LAN connection / LAN Verbindung or wireless network connection / Drahtlose Netzwerkverbindung, then right-click on 'Properties / Eigenschaften':

Within the following window please configure the IP address and the DNS server as follows:

  • Important: please check 'DNS-Serveradresse automatisch beziehen' and make sure that no DNS server address has been entered manually, so that the automatically assigned DNS server is used.
  • Then click OK.

Login to the Network

To log in please direct your browser to the following address:

login.uni-mainz.de

You will then (after confirming the security certificate) get the following login screen:

Here, please enter the user name and password of your JGU account. After successful login you will receive the following message: 'Anmeldung erfolgreich'. After that you will be able to use the internet almost as usual. Due to the usage of dynamic addresses and 'network address translation' there might be restrictions with some internet services.

In case the login screen appears again and again, there is probably a problem with the firewall on your device. An instruction for configuring the firewall can be found → here (for various operating systems).

Questions?

If you have any questions or problems concerning login to the network please contact our helpdesk. Mail: → hotline@zdv.uni-mainz.de or the network department of the Data Center. Mail: → noc@uni-mainz.de .

Posted on