Net Access

Configuration of VPN for Android

Android does not yet support the VPN type „IKEv2“. To be able to use this type, you can download the app  StrongSwan from the Google Play Store.

1. Tip at Profil hinzufügen.

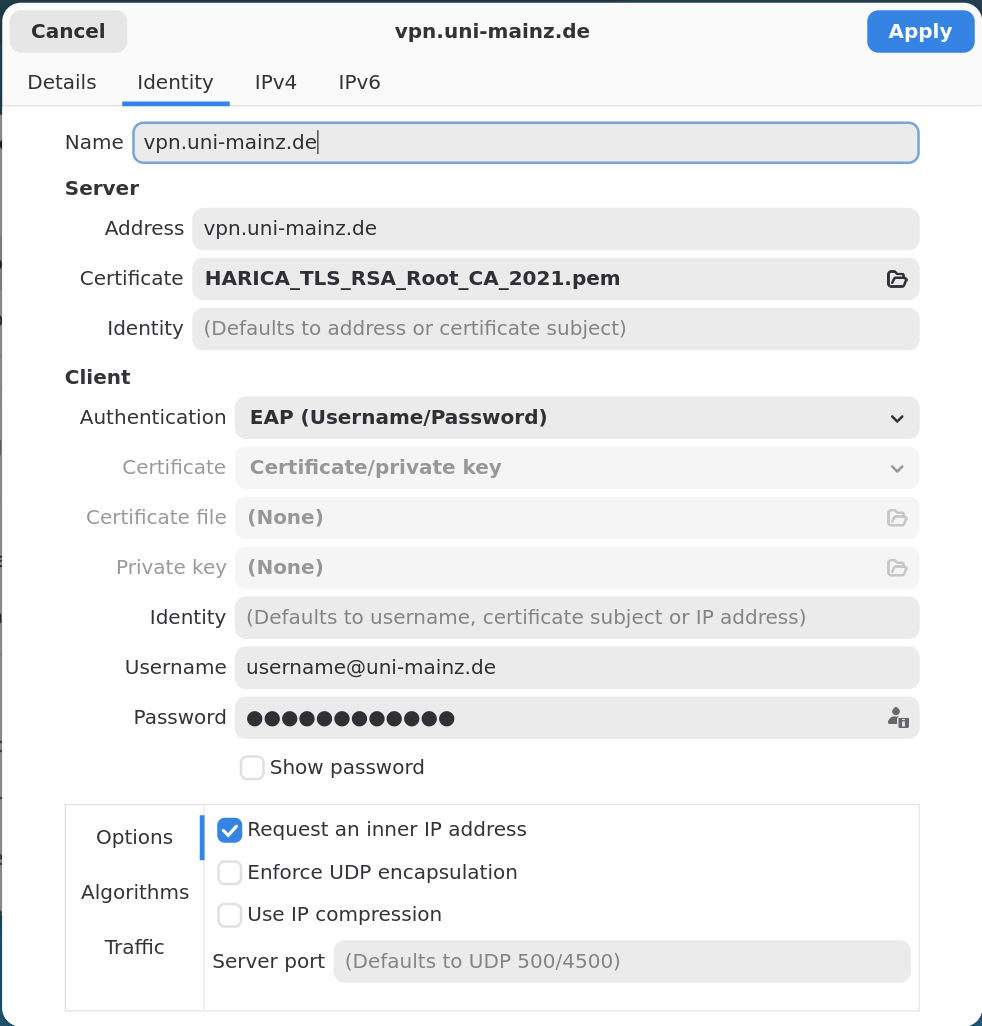
2. Enter the following data:
Server: vpn.uni-mainz.de
VPN-Typ (usually pre-selected): IKEv2 EAP (Benutzername/Passwort)
Benutzername: your JGU account user name (without @uni-mainz.de)
​Passwort: your JGU account password

​3. Tip at Speichern. Now you should be able to connect.

If you do not want to use an additional app, you may use the VPN type „PPTP“ instead. However, we recommend the type „IKEv2“ because of its higher security level.

Here's an example confiuguration for Android 4.0 Ice Cream Sandwich:

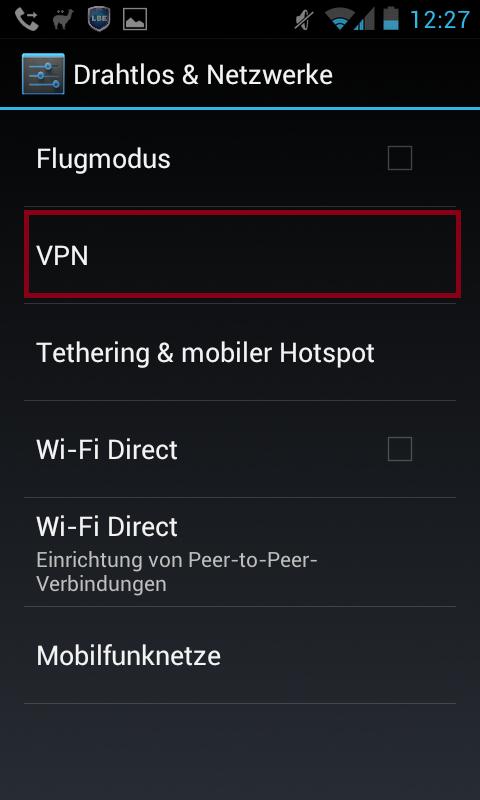
Open up Einstellungen. Below Drahtlos & Netzwerke tip at „Mehr…“:

Below Drahtlos & Netzwerke tip at VPN:

Then configure a new VPN connection by tipping at VPN hinzufügen:

Fill in the fields as follows:

Name: VPN Uni Mainz (your choice - this is arbitrary)
Typ: PPTP
Serveradresse: vpn.uni-mainz.de
IPSec-ID: secure-all
Vorinstallierter IPSec-Schlüssel: public

After that, go back to the previous interface. The connection will be shown.
Tip at it.

Enter your access data for your JGU account into the following pop-up window:

Nutzername: Your JGU account user name (without @uni-mainz.de)
Passwort: Your password

Posted on

Configuration of VPN for iPad/iPhone

This procedure ist identical for iPad and iPhone:

  1. Open Einstellungen -> VPN.
  2. Tip at VPN hinzufügen (if you already have a VPN configuration for the campus network, please deletet it).
  3. The following window will be shown:

Enter the following data into these input fields:

Typ: IKEv2

Beschreibung: an arbitrary name chosen by you, for example 'Uni-VPN'

Serveradresse und entfernte ID:
for both: vpn.uni-mainz.de
The input field 'Lokale ID' must remain empty.
Authentifizierung:

Benutzerauthentifizierung: Benutzername
Enter your JGU account user name here, followed by @uni-mainz.de: tester@uni-mainz.de (Please note: this is not quite the same as your mail address)
Passwort: your JGU account password

Proxy: aus

Now the VPN connection is established. Tip at Fertig.

Now you may use VPN in addition to your normal internet connection.

To do that, tip at Einstellungen -> VPN and push the Regler next to Status to the right.

Posted on

Configuration of VPN with Linux

Using VPN you can connect to the university network over the Internet. If you use VPN your computer behaves the same way as if it is physically connected to the university network. This way you can use the services that are only available from inside the university network.

VPN using IPsec/IKEv2 with Strongswan (recommended)

Installing packages

Install the necessary packages for Strongswan
Debian/Ubuntu:
$ sudo apt install network-manager-strongswan libcharon-extra-plugins
For Ubuntu, the "universe" distribution component must be enabled beforehand:
$ sudo add-apt-repository universe

Fedora:
$ sudo yum install NetworkManager-strongswan-gnome

Afterwards you have to restart at least the NetworkManager service (if in doubt, restarting the whole system will also help):
$ sudo systemctl restart NetworkManager.service

Necessary manual configuration

Now create the configuration file charon-nm.conf with the content charon-nm { plugins { eap-peap { load = no } } } e.g. by
Ubuntu:
$ echo "charon-nm { plugins { eap-peap { load = no } } }" | sudo tee /etc/strongswan.d/charon-nm.conf
Fedora:
$ echo "charon-nm { plugins { eap-peap { load = no } } }" | sudo tee /etc/strongswan/strongswan.d/charon-nm.conf

Create and configure connection

Open the network settings dialog (Settings -> Network -> VPN) and add a new VPN connection by clicking on the plus symbol +:

Select IPsec/IKEv2 (strongswan) as type:

Configure the following parameters:

Server -> Address:
vpn.uni-mainz.de
Server -> Certificate:
Comodo_AAA_Services_root.pem (see below)
Client -> Authentication:
EAP (Username/Password)
Client -> Username:
The username of your JGU account followed by @uni-mainz.de
(cf. Username on https://account.uni-mainz.de/)
Client -> Password:
The password of your JGU account
Options:
Request an inner IP address
Algorithms:
Enable custom algorith proposals
Algorithms -> IKE:
aes256-sha1-sha256-sha384-modp2048

When selecting the server certificate, press STRG+L and enter the following path:
/etc/ssl/certs/Comodo_AAA_Services_root.pem:

Connect

Click Apply and then establish the connection by clicking on the toggle button:


If you encounter problems creating and configuring the connection, try the program nm-connection-editor, too.

Posted on

Configuration of VPN for Windows 8

Invoke the Windows tools menu by pressing the Windows key + x. Within the following menu, choose Systemsteuerung:

Or: Click on the windows icon in the botom left and then type in "systemsteuerung" - which will display the 'Systemsteuerung' as an app to be opened. Open it.

Within the Systemsteuerung click on Netzwerk und Freigabecenter, then Neue Verbindung ... einrichten.

Next choose the menu item Verbindung mit dem Arbeitsplatz herstellen:

Click on Internetverbindung (VPN) verwenden:

Enter vpn.uni-mainz.de into the input field Internetadresse:
For Zielname you may enter a self-chosen name which you will later use to choose this VPN connection, e.g. Uni-VPN or VPN connection.

All other checkboxes can be left unchanged. Click on Erstellen .

In the next window you have to enter your JGU account user name and your password. You should only check the option 'Dieses Kennwort speichern' if you are the only user of this computer.

Finally, click on Verbinden. The VPN connection is now established.

Posted on

Configuration of VPN for Windows 10

If you would like to configure VPN for the first time, press the Windows key on your keyboard - this will display the Windows start menu your screen.

Then enter VPN at the keyboard (without clicking anywhere).

Now click on Virtuelle private Netzwerke (VPNs) ändern:

The window Netzwerk und Internet will be shown next. Choose VPN-Verbindung hinzufügen.

In the next window the following entries are to be made or chosen:

VPN-Anbieter: Windows (integriert)

Verbindungsname: this is arbitrary, you may for example call it 'VPN Uni Mainz'

Servername: vpn.uni-mainz.de

VPN-Typ: Automatisch

Anmeldeinformationstyp: Benutzername und Kennwort

Benutzername: your JGU account name followed by @uni-mainz.de:
yourusername@uni-mainz.de  (Please note: this does not in every case correspond with a person's e-mail address)

Kennwort: your JGU account password

If you do not enter anything in the fields for Benutzername and Kennwort, then you will be asked for them each time you establish a VPN connection. In case you want to save your login data, activate the checkbox 'Anmeldeinformationen speichern'. Then click on Speichern. Now the connection is permanently configured, but not yet active. In order to activate it, click on Verbinden within the open window.

If your are activating the connection for the first time you will see the follwoing notice: "Der Server kann nicht überprüft werden, da hierzu nicht ausreichend Informationen vorliegen. ..."

After clicking on Serverdetails anzeigen you will be shown the "finger print" of the VPN server:


You should check whether the character string shown is identical to the following one:

e5 04 5e ea 4d 2f 3a 1e 6f 05 ee 32 9d aa 21 e3 d0 15 fd 1e

Then, to activate the connection, click on Verbinden.

If you would like to disconnect later on, within the task bar on the right, click on the symbol for network connection. From within the list of available network connections shown then, choose the VPN connection and click on Trennen. In the same way, you may always re-establish the connection via the button Verbinden.

Posted on

Net Access from Outside of Campus via VPN

Please note: Some of the links below lead to pages in German, as work on the English version is still in progress. We apologize for the inconvenience.

In exceptional cases it may be necessary to authenticate your local computer via an additional network service: the so-called  'Virtual Private Network' (VPN) as a member of the Johannes Gutenberg University Mainz.

This applies to::


  • certain download areas,
  • access to the directory 'uni-mainz' via the FTP server of the Data Center,
  • enhanced features of literature research at the university library, as well as access to full text editions of certain electronic journals. For these, please see: → http://www.ub.uni-mainz.de/datenbanken-id-927 .

After configuring your operating system with the relevant driver you will be able to use VPN. The link to the download site for the driver, as well as hints for configuring your operating system may be found in one of the following documentations:


Instructions for non-Windows operating systems may be found within the collections of documentations specific to the following operating systems:

Mobile devices using Adroid
Instructions for the macOS operating system (in German)

Instructions for Unix Operating Systems


Posted on

Net Access from PC Workplaces

Please note: Some of the links below lead to pages in German, as work on the English version is still in progress. We apologize for the inconvenience.

All buildings of the university are wired in a structured way (with constraints at the tower building at the Augustusplatz). Almost all rooms have ethernet network sockets.

We recommend the following sequence:


  • Get a JGU account, if you do not already have one. This enables all members of the university to:
    • use a mail address of the following form: loginname@uni-mainz.de
    • use all services of the Data Center from outside of the campus (at home, on conferences ...).
  1. Check if the socket is activated. To do this, please fill in the following → application form for activation of a network socket and send it off.
    • If the socket is already activated, you will be notified about this in the lower part of the answer to your application.
    • If the answer states that your application is being worked on, then a member of staff of the Data Center still has to connect your socket to the campus network. After that has happened you will be informed about this via e-mail. The following steps may be approached beforehand:
  2. Find the address of your network card.
  3. If necessary, install the network card inside your device.
  4. Connect the network cable of your device with your wall socket:
    • cables and other network components are available at the helpdesk and may be payed with the copying card of your institúte (Schomäcker card, for university members only).
  5. Proposal of a name and registration of the physical address in order to receive an IP address for the device: → application form for an IP address.
  6. Configure the device for use at the university: obtain the IP parameters automatically from the network. In order to check this, please see → server addresses for computer configuration.
Posted on

Net Access Via Cable in Public Rooms

Information about the Login System

Using the login system you may connect your own notebook to the internet at any activated network socket on campus (for example in the corridor on the ground floor of the natural sciences institute building), as well as within all of the wireless network access areas.

Connecting via Wireless LAN

For this you need to have a WLAN card in your device.

Connecting via a Network Plug

For this you need to have an Ethernet network card in your device that has a fitting (RJ45) connection.

Preparing Your Device

This requires the following configurations: in the system administration below network connections choose LAN connection / LAN Verbindung or wireless network connection / Drahtlose Netzwerkverbindung, then right-click on 'Properties / Eigenschaften':

Within the following window please configure the IP address and the DNS server as follows:

  • Important: please check 'DNS-Serveradresse automatisch beziehen' and make sure that no DNS server address has been entered manually, so that the automatically assigned DNS server is used.
  • Then click OK.

Login to the Network

To log in please direct your browser to the following address:

login.uni-mainz.de

You will then (after confirming the security certificate) get the following login screen:

Here, please enter the user name and password of your JGU account. After successful login you will receive the following message: 'Anmeldung erfolgreich'. After that you will be able to use the internet almost as usual. Due to the usage of dynamic addresses and 'network address translation' there might be restrictions with some internet services.

In case the login screen appears again and again, there is probably a problem with the firewall on your device. An instruction for configuring the firewall can be found → here (for various operating systems).

Questions?

If you have any questions or problems concerning login to the network please contact our helpdesk. Mail: → hotline@zdv.uni-mainz.de or the network department of the Data Center. Mail: → noc@uni-mainz.de .

Posted on