Within the left-hand navigation, click on Benutzerkonto (in the English user interface it is called User account).
Listed beside 'Heimverzeichnis/Home directory' you will find the information about the server name, formatted like this: \fs01\youraccoutname$ or \fs02\youraccoutname$.
A guide on how to use TSM on Windows is only available in German, as work on the English version is still in progress. We apologize for the inconvenience. The guide is available here.
Tivoli Storage Manager (TSM) enables you to do → incremental backups of computers, and to archive files.
Backups facilitate protection and recovery of files, for example after a disk problem or after accidental deletion of files. At the TSM server the files will be overwritten with any new version, and the previous version as well as the newest version will be provisioned on the server. If the previous version is older than 90 days it will be deleted.
If a user deletes a file on his computer, the latest version of the file will be stored on the server for 180 days and earlier versions will be deleted.
Please note: if you save a file with the same name in the same directory as the file that was previously deleted, then the backed-up latest version of the deleted file will be overwritten by the new file at the next backup.
We recommend to make a daily backup of file systems and to exclude directories with many files that change very often (scratch, tmp, ...). If the latest backup of a file system was made more than a year ago, it will be deleted by the Data Center.
A backup is tied to a specific computer.
Archives are made for storing files that are currently not - or only rarely - needed. This enables you to save storage space on local storage media..
In case of a re-setting of the archive system of the university the users of the archive have to transfer the files from the old archive to a new one no later than 3 months after having been notified.
Archives can be access by multiple persons using a password.
Apply for access
Your computer needs to be added as a node to the server. You may apply for login credentials by writing an email to hotline@uni-mainz.de.
You need to provide the following information:
For Backups
A valid email address
Your computer's IP address
Linux
You can get your computer's IP address by typing ip addr. You will see a list of all your network interfaces. Choose your network interface. In most cases this will start with "en" on a wired connection and with "wl" on a wireless connection. Your IP address can be found after the first line starting with inet.
Windows
Type ipconfig into your terminal. We need the Ipv4 address.
FQDN (Fully Qualified Domain Name)
Linux
You can get your FQDN by typing hostname -f inside a terminal.
Windows
Press windows + pause a windows opens the FQDN is the "Full computer name".
You may also access the Data Center storage space with iPhone oder iPad devices, provided that you have a suitable app installed. In this example we used WebDAVNavigator, but the procedure described here should be usable for other apps along the same lines. We have tested the following apps: OverTheAir (free of charge), iFiles, iStorage HD, GoodReader.
Please note: We don't recommend saving your password on mobile devices. If you leave blank the corresponding field, you will be asked for your password every time you establish the connection. This is somewhat cumbersome but will save you a lot of trouble if you ever lose your device.
You may also access the Data Center storage space with Android devices.
We have tested this with WebDavDroid Lite (available for free in the market). But the precedure described here should work in the same way for other apps.
Configuring the Server
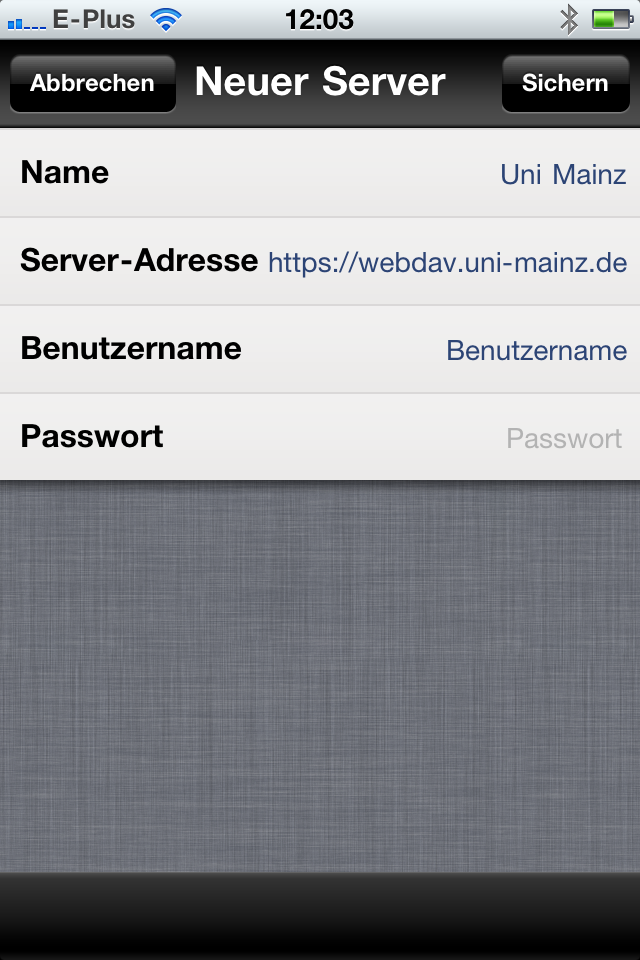
To establish a connection to the home directory of your JGU account you have to configure a new server. Here, this is done via the Add button.
The following settings are needed:
Name: the name of the connection used by the Webdav app. All you have to do is recognize it as what it is. You might name it 'uni-home' or 'webdav uni' or something similar.
URL: https://webdav.uni-mainz.de/home
UserId: yourusername@uni-mainz.de (please note: this is not your mail address, even if it looks similar)
Passwort: your password for your JGU account. On mobiles devices we would recommend not to save the password on the device - if you do not enter your password here you will be asked for the password whenever you are establshing the connection. Although that is more arduous it could save you a lot of trouble in case your device gets lost or stolen.
Establishing the Connection
Now you can establish the connection: Tip at the server name for a longer time, then choose Connect Server:
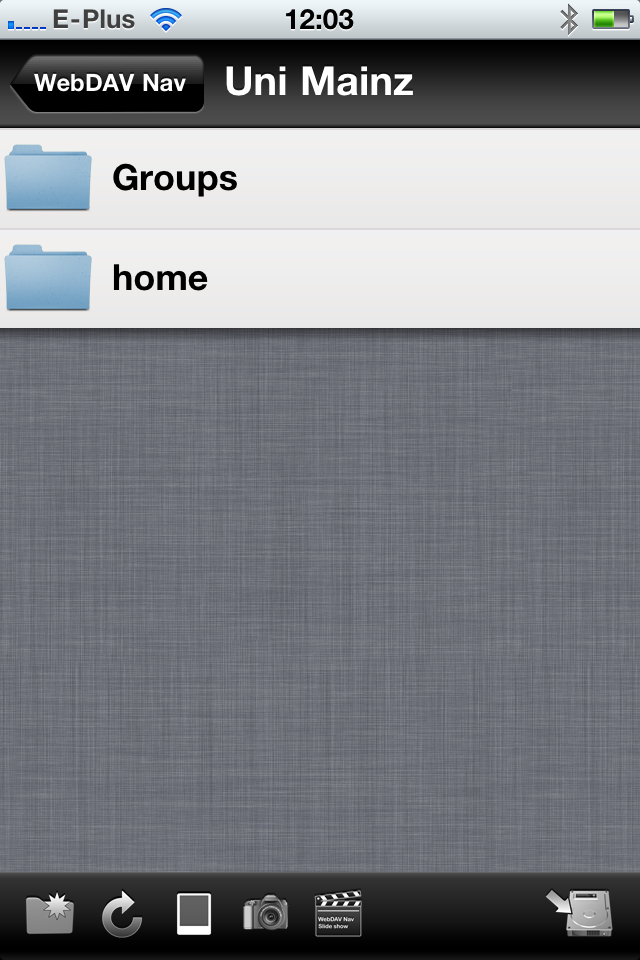
After that you may choose the directory to be looked at or worked with:
Local Folder, if you want to send files from your Android device to your university home directory.
Server Folder, if you want to download files from your university home directory.
After a long touching of a single file you can use the following menu and choose the desired action:
Changing between local and remote directory (i.e. between your Android device and the university home directory) is done be touching the menu button - here you may choose the respective other folder.
Inside your file manager, open the address bar by pressing Ctrl + L.
Enter the address: davs://webdav.uni-mainz.de/home/ (This will work on most desktops.)
or webdavs://webdav.uni-mainz.de/home/ (If you use KDE as your desktop environment.)
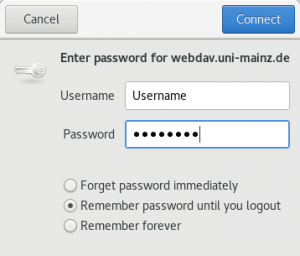
This opens a login window. Enter your university user name and password.
You should now see your home folder.
The folder is also displayed inside your left overview panel, right click on it to create a bookmark.
Connect to your group folder
You can also connect to a group folder, if you have the rights to access this folder.
Open the address bar by pressing Ctrl + L inside your filemanager.
Enter: davs://webdav.uni-mainz.de/groups/ [Your Department]/[Name of Group Folder]/
or (if you use KDE.) webdavs://webdav.uni-mainz.de/groups/ [Your Department]/[Name of Group Folder]/
[Your Department] is normally the number of your faculty.
example: davs://webdav.uni-mainz.de/groups/70/zdv
This opens a login window, enter your university username and password. You should now see your home folder.
The folder is also displayed inside your left overview panel, right click on it to create a bookmark.
From here the procedure is the same for all of the Windows versions mentioned above.
Confirm the first pages of the following dialogue and enter the following address as web/ftp site address or network address:
https://webdav.uni-mainz.de/home
(Please note the "s" in "https") Confirm this with Weiter .
Now you must fill in your user name and password.
In the following window you can define a name for the connection or simply accept the name as proposed by Windows (you will find your home directory under that name in Windows explorer). Then end the assistant dialogue.
Your home directory will now be available in your Windows explorer just like a network drive with the name you assigned to it.
In the same way you can connect a group directory to your PC via Webdav (this requires that you have the necessary permission to access the group directory).
With Windows 10
Open Windows explorer ( Windows key + E ). Then click on 'Dieser PC'.
Within the top menu click on Computer.
Then click on Netzwerkadresse hinzufügen.
With Windows 8
Open the Windows (computer) explorer ( Windows key + E ).
Click on hinzufügen.
With Windows 7
Open your Computer in Windows explorer.
Right-click anywhere within the right part of the window,
Within the context menu then click on Netzwerkadresse hinzufügen.
Further action
From here the procedure is the same for all of the Windows versions mentioned above.
Confirm the first pages of the following dialogue and enter the following address as web/ftp site address or network address:
https://webdav.uni-mainz.de/groups/[your sector]/[your group directory]
(Please note the "s" in https, please enter your sector and directory without the brackets). [Your sector] usually is your faculty, [your group directory] the name of the group directory.
Confirm by clicking on Weiter . Now you will be asked for your user name and password. Enter those data and then click on Weiter.
Finally, please enter a name for the connection or accept the name as proposed by Windows (the name is used for display in Windows explorer). Then end the assistant dialogue.
Your group directory will now be available in your Windows explorer just like a network drive with the name you assigned to it.
In case you are copying a file with a file size bigger than 50 MB to your local computer you might get the following error notice:
The reason for this is a Windows system configuration which was made to preclude attacks against your computer - but in this case the preclusion is unjustified, since you yourself wish to save this big file on your computer. The preclusion can be switched off by a making a change in the Windows registry. Further hints on how to do that can be found here: → http://support.microsoft.com/kb/9009000
Docuware is the central Document Management System (DMS) of the university, which is being used for both scientific and administrative purposes and is run by the Data Center.
The Document Management System serves as a central repository for revision-safe and long-term archiving of digital documents - to be retrieved at any time.
For this we set up Docuware archives, where PDF documents can be stored with structured metadata and indexing fields. Storage can also be configured in an encrypted format in case this is necessary for data privacy.
Documents and files may be flexibly imported into the system from various data sources. Writing and reading access is enabled via the JGU account and is administered using separately configured authorisation concepts for each archive.
Indexing usually happens eitther when new documents are being manually filed into the archive, or when they are being automatically imported. In some cases indexing is configured as a nightly job.
For projects with extensive amounts of data an individually configurable scanning software with barcode recognition is available.
Content access for all archives is available via the web browser and therefore platform independent.
Services of the Data Center
We will counsel regarding the implementation of your requirements, establish archives for you including authorisation schemes and indexing fields and, if required, configure the system for automatic imports and/or nightly indexing.
We will also, if requested, counsel regarding applicable scanners and provide support in case of problems or questions.
The Webdav protocol enables users to connect to their home directory (drive U:) from their PC (at home or anywhere else outside of the university network), so they can access the data there, work with them and simply use those directories as online storage space.
If you have been granted access to group directories, Webdav may also be used to connect to those directories. For Webdav connections VPN is not required.
Instructions for your operating system are to be found here:
In case you unintentionally deleted files from your home directory or from a web site hosted at the Data Center, rest assured that recovery of the original state of the files/directory is usually no problem. You can recover files from one of the periodical 'snapshots' of our server directories.
Every four hours, i.e. at 00:00, 04:00, 08:00, 12:00, 16:00 and 20:00 the state of the files within the home directories of all users, as well as in all web directories, is recorded in what's called a snapshot. The most recent 6 of these versions, and the most recent seven of the previous nights (made at 00:00) are saved and can be re-called by all users who have access to these files. The individual backup copies are called hourly.0 (the most recent one), hourly.1 and so on., as well as nightly.0, nightly.1 ... and weekly.0, weekly.1 ...
The most recent eight weekly snapshots are also kept on an additional server which is not publicly accessible. Usually, there is no way of restoring versions of files that are older than 8 weeks.
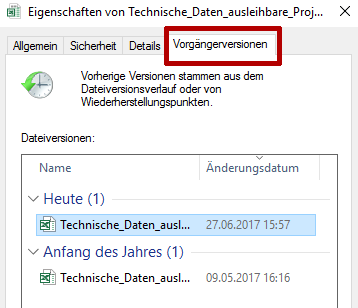
Within the Windows pool of the Data Center snapshots may be accessed via Start -> Programme -> ZDV Backup.
Right-click on the name of the file which you would like to recover from a snapshot. Now choose the menu entry ‚Vorgängerversionen wiederherstellen’ and within the small window that opens after that choose the tab 'Vorgängerversionen':
Here you may click on the version of the file that you need and recover it by clicking on the button Wiederherstellen below.
Backup copies of server directories within the domain uni-mainz: this data backup is performed automatically. All users may → recover data in a very simple way, in case data have been lost or, for example, if errors have been discovered in an updated version of files within the directory. Backup copies of server directories are being made of all home directories, web directories (virtual hosts) and all group directories. Backups of complete PCs within the domain are unnecessary, since home and group directories are being backed up and since saving of files on local hard drives is not required.
TSM-Data backup: for computers that are not part of the domain uni-mainz. The principle is → explained here.
If you additionally need to store huge amounts of data, please contact the → Data Center helpdesk.
Instructions for non-Windows operating systems may be found within the collections of documentations specific to the following operating systems:

 If you do not know on which one of the two servers fs01 or fs02 your home is located, you can obtain this information in the following way:


 Docuware is the central Document Management System (DMS) of the university, which is being used for both scientific and administrative purposes and is run by the Data Center.